No matter what level you are at in your guitar playing, it is always really helpful to go back to the core fundamentals of playing when you want to advance. Huge improvements in speed, ease of playing, and musical expression can be gained simply by making some tweaks to fundamental techniques.
Left hand guitar position and technique is something I’m always coming back to in my own playing. The concepts I’m going to share with you today are crucial for being able to progress in your playing and play the more difficult repertoire on the instrument.
Improving your left hand technique is straightforward to do with the correct know-how, but the payoffs are enormous. A good left hand technique can not only protect your hand from injury, but will also make you a much faster and accurate guitarist.
Don’t have time to read this post now? Get your Handy PDF Download: Click this link to get a print freindly version of all the exercises in this post for your practice.
What this episode covers:
- How to keep the left hand relaxed and free as you play
- The correct left hand position on the guitar neck
- Correct thumb placement
- The versatile nature of left hand placement
There is a lot of incorrect information out there on this topic that I’ve seen in various books on technique so I want to take this opportunity to clear this up so that you have a good idea of what you need to do to improve this aspect of your guitar playing.
Ok let’s get into it! Here are the 5 core principles you need to keep in mind:
Principle #1: Keep your Hand Very Relaxed
I know this sounds obvious but it is so often overlooked. People wonder why they keep bombing out at the most difficult part of a piece of music they are working on. Probably the anticipation of this difficult section is actually making them tense their hands up right before it comes up – setting themselves up for a big fail on stage.
Relaxing your hands will enable your music to flow easily, will improve your coordination and will help to easily increase your speed on the guitar.
Principle #2: Correct Thumb Placement
You don’t know how many times I’ve seen the instruction in classical guitar books to ‘put the thumb in the middle of the neck’.
This is bad advice.
Sure, there are times where you will need to put the thumb square on the back of the neck , eg bar chords or playing lower strings combinations, however generally the standard position of the left hand thumb should look like this, resting on the mid-side of the guitar that is closest to the lower strings:
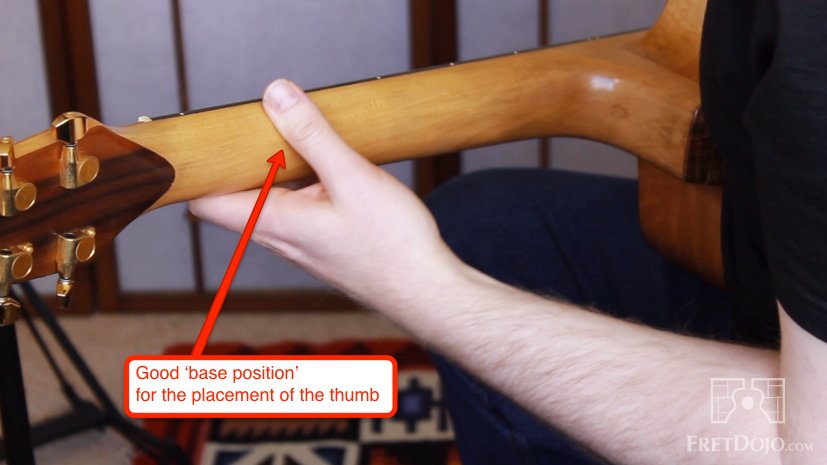
The thumb position is also flexible – it never stays in one position for long. Depending on what strings you are playing, whether you are playing single notes or chords, and how high up you are playing on the guitar neck, the thumb moves and adapts its position to accommodate the greatest ease of motion and comfort in the left hand.
Principle #3: Appropriate Left Hand Finger Pressure
Pressing too hard or too lightly on the strings can also cause a lot of technique problems. If you press too lightly you will buzz the strings and sound a bit like an AM radio that hasn’t quite been tuned in properly. If you press too hard you will cause a lot of tension in your hand and body, which could injure your hand, make your playing sound tense and rigid, and will impair your speed.
A good remedy for finger pressure problems is (ironically) the ‘buzzing’ exercise that is covered in the lesson video above. This exercise teaches your hand ‘Goldilocks’ style – not too much pressure, not too little, but just enough.
Principle #4 Fingers Close to the Frets & Flexibility of Left Hand Angle
Keeping the fingers as close as possible to the frets is generally a good principle to keep in mind, especially if you are a beginner. However be aware that this isn’t always the case, and is a very general instruction – there are situations which are exceptions to this rule.
Depending on what the fingers are doing at whatever point in time, the left hand needs to slightly shift the angle to accommodate the left hand fingers to get close enough to the frets.
However, there will be times when your 3rd and 4th fingers simply can’t be placed directly behind the frets. That is ok though- usually if they are slightly back from the frets the guitar won’t buzz if the guitar action is set properly. People with smaller hands will need to compensate the left hand angle much more frequently to facilitate good find finger placement.
The correct angle and placement of the left hand is highly related to the final and most important point to consider in regard to left hand technique, which is…
Principle #5: Does Your Hand Actually Feel Good?
The ‘feel’ in your hands is so important when it comes to left hand technique (and right hand technique as well for that matter). This is some of the best advice I’ve ever received on guitar playing (big shout-out to Tim Kain of Guitar Trek fame for this one!) and I find myself often coming back to this idea as I practice.
Here’s how to do this one. During your practice session, ask yourself the following question:
‘Regardless of whether or not my technique or fingering is ‘textbook correct’, does it actually feel good? Does it feel good in my hands? What about my body, how does that feel?’
Whether or not a particular fingering pattern or solution makes logical sense, if it simply doesn’t feel good in the hands after you play with it for a while, reject it and find an alternative fingering, arrangement, or tweak in your hand position/finger placement.
This simple tip has been my most effective strategy for getting music to flow and expressing myself easily on the instrument. This principle will guide you to develop the more subtle aspects of a relaxed, coordinated and agile left hand. Becoming more aware and in tune with what your body is telling you about your technique is the single most important feedback you can get in order to improve your technique.
Left Hand Coordination Exercises
Now that we have the position and manner in which the way the hand moves, let’s now look at some basic coordination exercises. I’ve prepared a downloadable pdf of some of the best coordination development exercises I’ve come across, as well as a bonus video that will walk you through them. Enjoy!
In Closing…
When I was writing this post it almost feels like it is stating the obvious when it comes to a solid basis for left hand technique, however it is so common for guitarists to have severe roadblocks in their playing due to a slightly wrong approach or hand position, so it is always useful to review your left hand guitar technique and position from time to time and notice if you are keeping the above points in mind. I hope that this has provided some insights to opening the door to effortless mastery of the guitar.
Thanks for reading! Let me know what you think about this post, it would be great to hear from you.


Thanks for the lesson. Gives a good set of items to remember.
Thanks for reading Chuck! Hope it helps with your playing :)
Hey Greg, great information here. Thanks bud. Love from Michigan
Thanks Jackie! Glad you found this one useful.
I think the reason classical left hand technique advises putting the thumb primarily in the middle of the neck, is due to the greater width of the classical guitars neck and fretboard. Classical guitars often have 2 inch wide necks which necessitate having that thumb placement, especially for some of the longer stretches found in classical pieces.
I agree with you Sam that you would need to put the thumb more often in the centre of the neck for stretches, however I think it’s misleading that there is a single position to put the thumb. in the end, the thumb moves in a variety of positions depending on what chord and what stretches you are doing.
As a side note, I studied with Tim Kain for many years, one of the best classical guitarists the world over, and more often than not he had his thumb more on the side of the neck than in the centre of the neck when he played.
Many times jazz and especially rock guitarists show their thumb way above the neck, especially when pulling strings. How bad is that? Should this be avoided, if it feels comfortable? Ritchie Blackmore comes to my mind, not to speak about Tommy Emanuel – who seems to be pressing on the lower E string with his thumb.
Thank you Greg-san, for the guitar dojo. I agree with both techniques thumb up high on the neck, or middle for classical guitars and basically moving to accommodate a chord or certain passage. In my opinion, another thing to keep in mind is not to use the thumb to hang onto the guitar. I found myself kind of hanging on the guitar after a long session or when fatigued. It’s best to rest and not sacrifice technique by hanging the thumb over the neck because the left arm is tired. Doing so seemed to take away from the relaxed feeling in the left (fretting) hand.
Hi, Greg. I picked up this link from a comment you made on thumb position for Alan last week. I have a (sort of) classical background and have been playing a traditional classical guitar for the better part of 35 years. Classical music is one of my continuing loves – as is jazz – and since signing up for the Academy last month, I’ve been concentrating my practice and playing in the jazz idiom.
I strongly agree with your comments on thumb placement. It took me many years to get past the ‘always in the middle of the neck behind the second finger’ directive. I like your concluding observation: let your body tell you what’s right. With this as background, I wounder if you have any suggestions about the positioning of the left arm for effective playing. Again, the traditional classical approach has the guitar resting on a raised left thigh, which positions the neck at about a 45 degree angle. I find that I’can’t comfortably maintain this position for more than 15 or 20 minutes. As I consequence, I play mostly with the neck at an angle that is a few degrees above parallel to the ground.
Do you have any thoughts on this?
Regards,
Tom
Re: arm placement, relaxed as possible, with the guitar neck angles away slightly from your body so that the arm doesn’t get ‘bunched up’. Re: raised classical position vs standard jazz guitar position – for most jazz guitar approaches I don’t bother putting guitar on the left leg etc like a classical player, as there are rarely situations when playing jazz where you have to have those extreme fingerings like in classical guitar which requires a position as ergonomic as possible, e.g. in jazz you play a lot of single lines (even when playing solo guitar) which doesn’t require the classical position. I also find the classical position makes it harder to get the music to swing for some reason, I get a bit kind of ‘stiff’ in the body in that posture. But a good alternative is standing up with a strap (perhaps alternate with sitting) as that will give you that raised angle of the neck without needing to resort to a classical posture. Hope this helps Tom!
Thanks for posting! Great info for acoustic guitarists, although anyone interested in classical guitar should bear in mind that there are some subtle differences.
For an in depth look at left hand positioning for classical guitarists, check out this lesson: https://www.classicalguitaracademy.co.uk/left-hand-positioning-and-technique/
That being said, it’s nice to see there are still plenty of common factors between acoustic and classical technique, such as relaxing the hand and using optimal pressure. Super post for acoustic guitarists, thanks again for posting!
Thanks for the free lesson! Just beginning to learn guitar and it helped a lot. Much appreciation :)