Have you been struggling with jazz guitar improvisation and are wondering about the best jazz guitar scales to use?
In this jazz guitar lesson, I’m going to show you a simple yet easy trick to improvise over the entire fretboard using a clever jazz scales method I call the “Tree System”.
This system will make the fretboard easy to understand, give you a great framework for remembering all those jazzy scales, and save you a lot of time as well.
Bonus PDF Download: To get your free printable PDF which has the jazz scales guitar tabs and diagrams for this lesson, go here>>
Stick around to the end of this beginner jazz guitar lesson, because as a bonus I’m also going to give you some very useful tips on how to derive any jazz guitar scale or mode from this one pattern that I’m going to show you today.
Video Sections:
00:00 Introduction
01:19 The problem with CAGED scales (or box patterns) for jazz guitar positions
02:44 Introducing the “Tree” jazz guitar scales system
03:43 Branch 1 of the Tree System for jazz – major scale
06:27 Improvisation example with Branch 1
06:53 Branch 2 of the Tree System
10:07 Benefits of the Tree System
11:01 Guitar modes – creating a Dorian Scale from the Tree system
14:20 Wrap Up
The Issues With Box Position Jazz Guitar Scales:
In the past you might have learned something about the CAGED system otherwise known as “box patterns”:
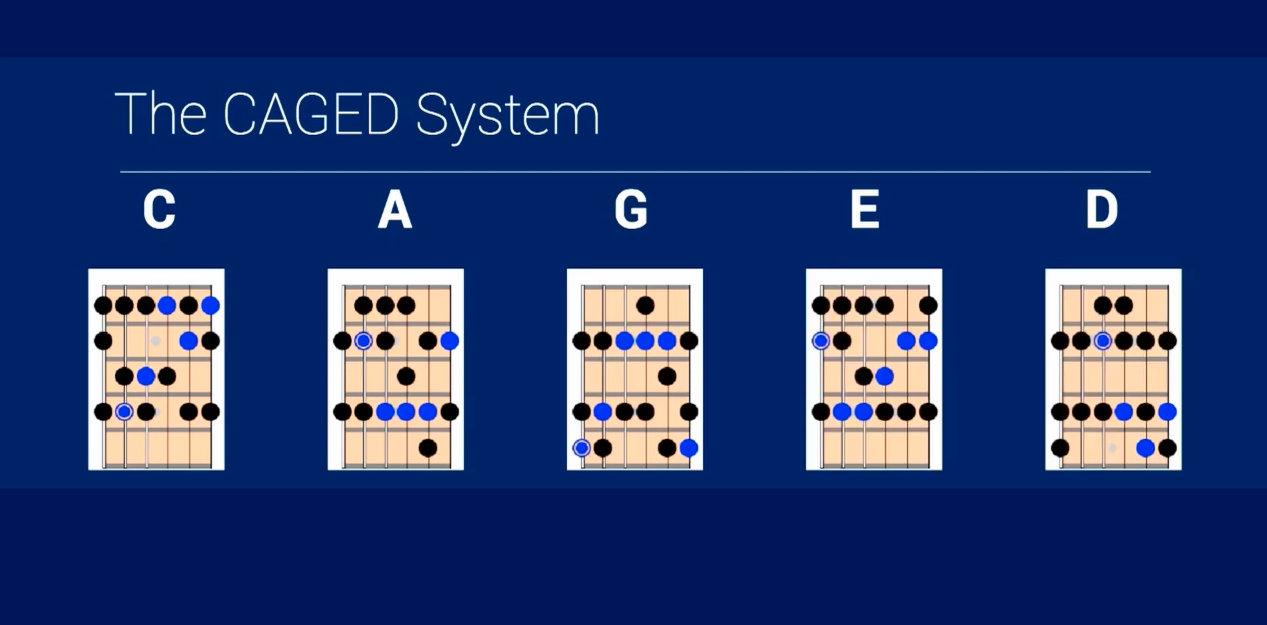
This system splits the guitar neck into five boxes. Every box has notes out of the major scale, but just starts on a different note.
There are some issues using this approach for jazz guitar though:
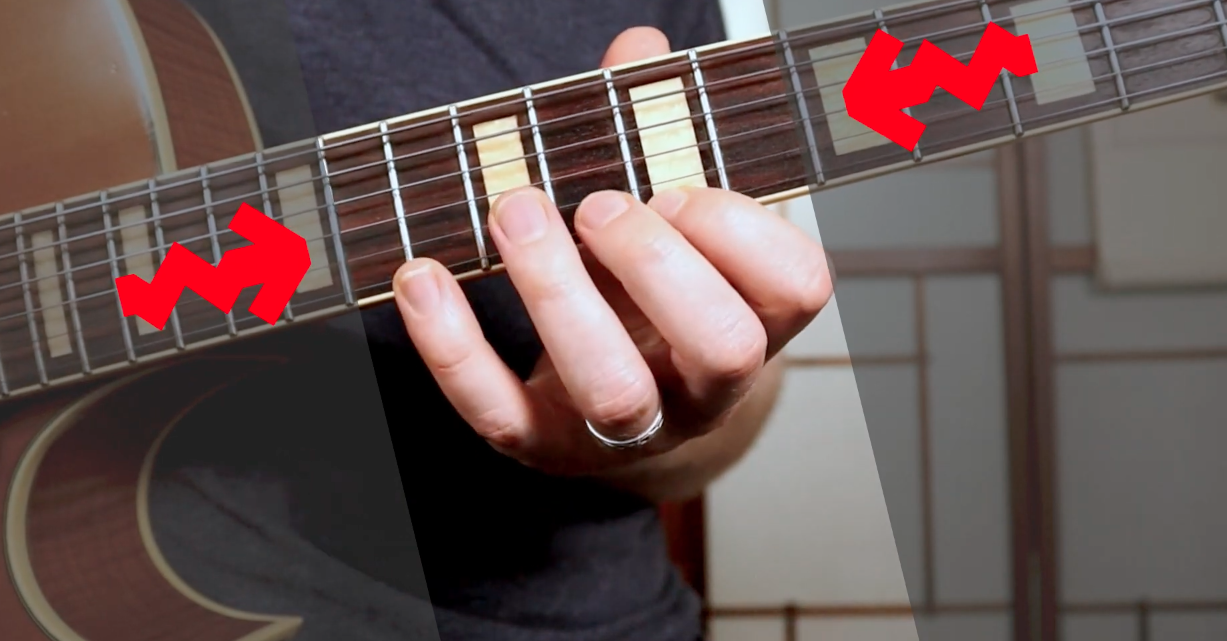
Problem #1:
These box scale positions literally box you in! Being fixed in a single position like this can be very limiting. It really does feel like you are chained up, constrained, and unable to completely express yourself on the instrument:
Problem #2:
A lot of the interest in jazz comes from crossing a wide range of pitch when playing a phrase, such as this one:

But if you look at the box scales, at least 50% of each pattern is not that useful, as most of the pattern is too low – which can get very muddy when soloing, especially when playing with a bass player or another guitarist.
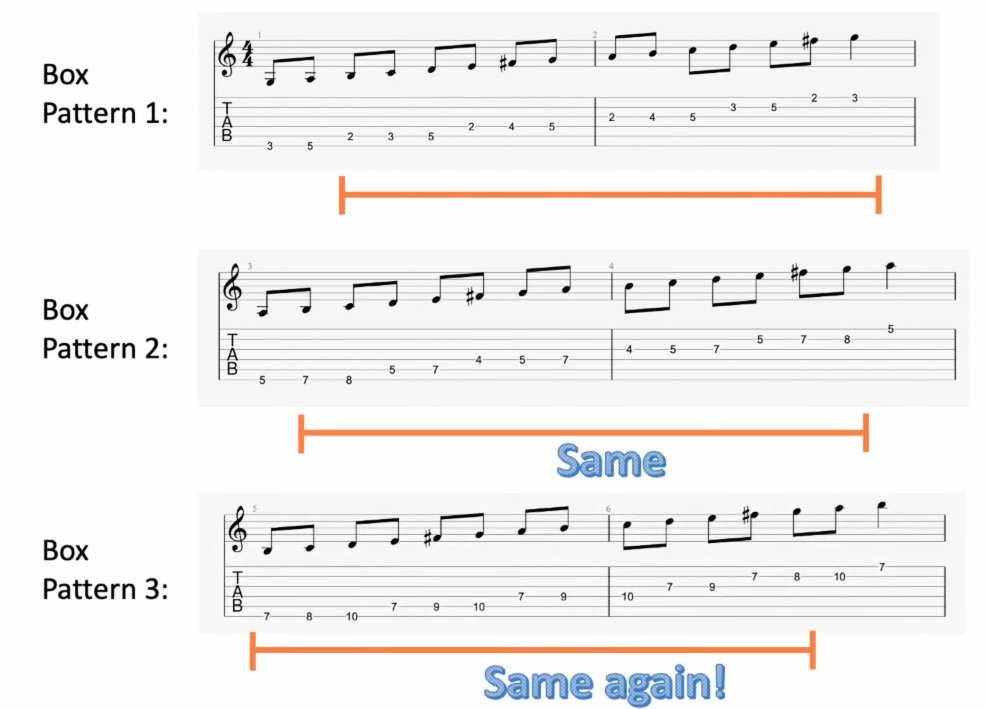
Problem #3:
The majority of notes repeat themselves in each of the box scale positions. It’s not a very efficient learning method as you are learning all these different patterns with the same notes basically repeated in each one:
Now don’t get me wrong – box patterns are still good to learn, and for rock and blues they actually work pretty well, due to the very limited number of key changes in most songs in those styles.
But in jazz music, the key changes come thick and fast, and you can very quickly get muddled with those box patterns. If you are always scratching your head trying to work out where the notes are that you want to target on the fretboard, this will distract you from actually making music.
A Different Way To Go About Jazz Scales For Guitar:
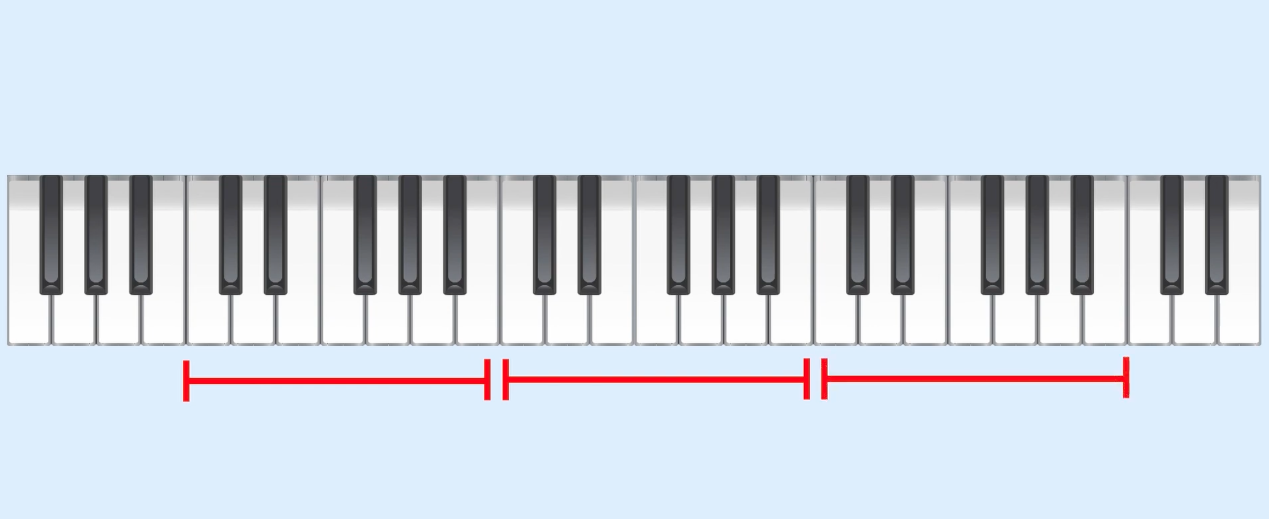
Let’s think for a moment of a piano and how it’s laid out.
There aren’t multiple ways to play the same note on a piano. Middle C is always middle C, and there’s no way around it:
Also notice how the octave of each scale looks the same – you don’t need to remember a new pattern each time you go up to the next octave:
So what if we treated the fretboard similar to a piano?
Could we just learn one basic layout to the whole fretboard so you would instantly know where scale notes are anywhere on the neck?
Let’s have a look at a system where we can start to treat jazz scales more like a pianist, and greatly simplify our learning of the guitar fretboard for improvisation.
Introducing the “Tree” Jazz Guitar Scale System
I find one octave patterns much easier to remember and to lay the fretboard out with instead of using box patterns.
Let’s begin by looking at this one octave G Major guitar scale:
So far so good. This will be the first pattern of our ‘tree’ system.
Now let’s look at another single octave G Major scale, but this time starting on the 4th string instead of the 6th:
Notice anything similar?
Although the scale shapes are different, they start in the same way – both start with the 2nd finger, and the first 3 notes are in the same finger pattern in each.
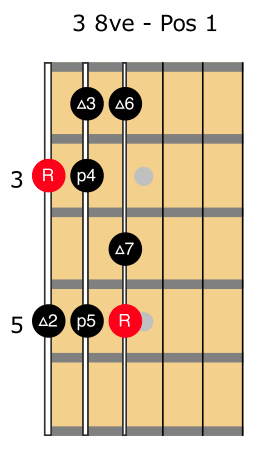
Now let’s look at one more pattern – this time up around the 7th fret:
This isn’t a complete scale diagram as I would then need to shift out of position to reach the final notes (they would be on fret 12, 14 and 15).
But notice how in this scale shape how, once again, the pattern of the first few notes are the same as the other patterns.
So if we link these 3 guitar scale shapes together, we get one large pattern across the fretboard, moving ‘diagonally’:
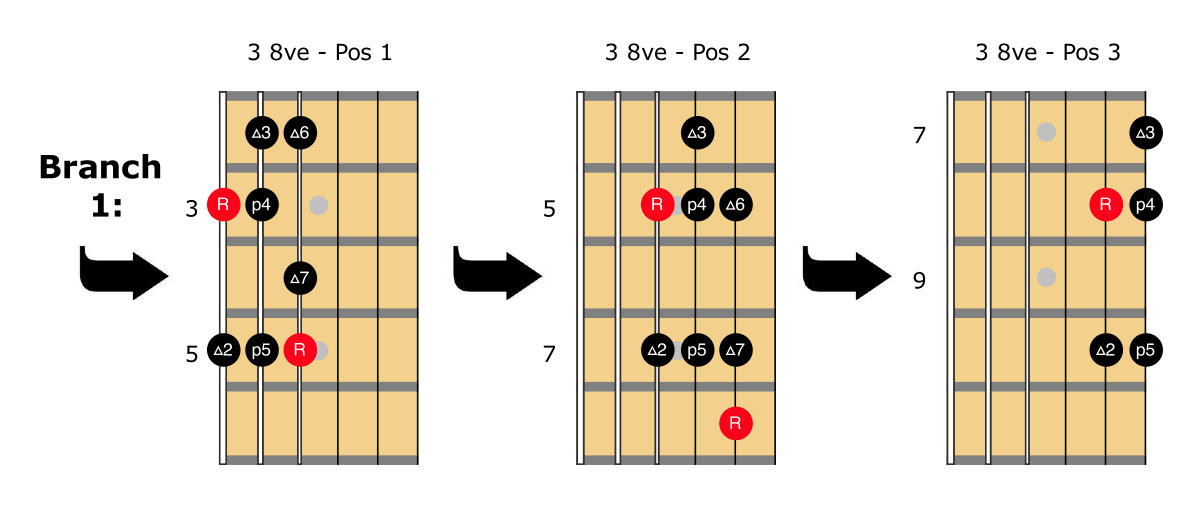
What’s neat about this:
This 3 octave mega scale is so easy to remember.
Each new octave begins with the 2nd finger – and the same finger pattern for the first 3 notes in each octave.
We now have one scale, covering the most usable range of the guitar. Rather than learning several box patterns that overlap, you only need this single diagonal pattern to solo with G Major over the entire fretboard.
Working Out Scales In More Keys:
Now, in order to get different keys, all you need to do is to shift this pattern up and down the neck.
The pattern that I showed you above works well for several keys like F#, G, Ab, A, Bb and B.
But other keys such as Eb or F won’t work as well, because I’ve run out of frets down the lower end of the guitar.
But we can use this idea of single octaves linked diagonally to work out an extra “tree branch” which will complete our full “tree” scale system. Read on to learn how…
Branch 2 of the Tree System for Jazz Guitar Scales:
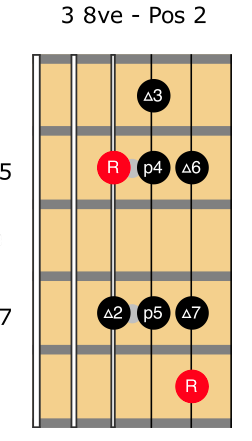
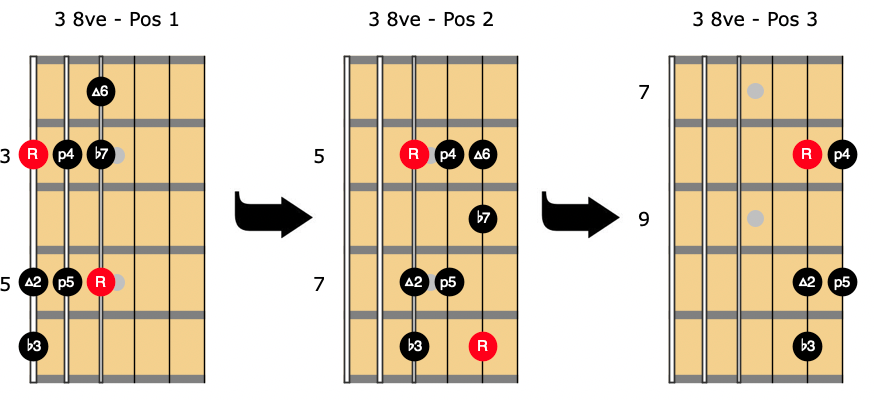
Here’s a couple more one octave scale shapes that will comprise Branch 2 of our system:
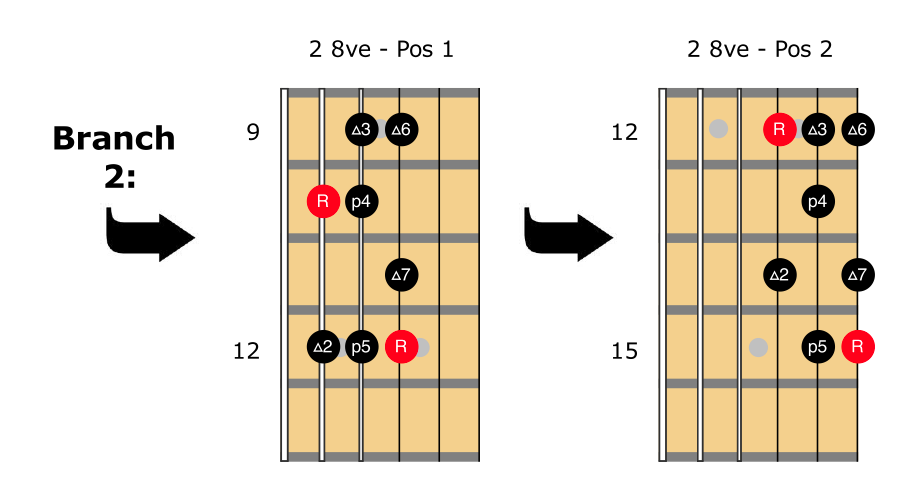
Notice how the pattern on the left in the above diagram is exactly the same as the very first pattern we covered earlier in this lesson – it just starts on the 5th string instead of the 6th.
The second pattern in the above diagram is the only distinctly different pattern in the whole system, as it starts with the first finger instead of the second.
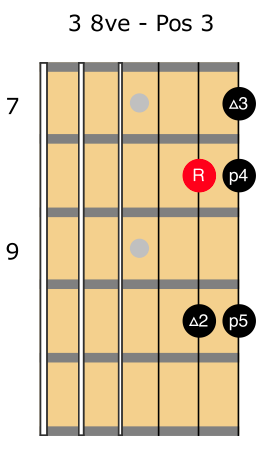
Remember those 3 high notes that I needed to finish off the first branch?
This is actually the top string of our final pattern:
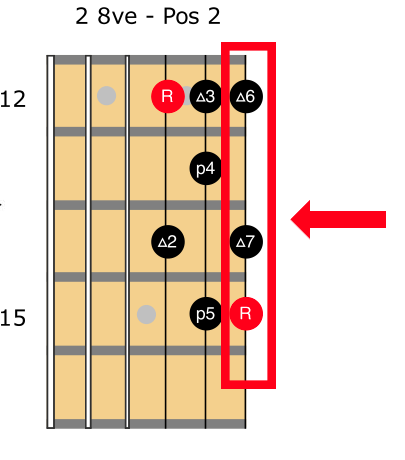
So this is the point where all these scale patterns connect, like the trunk of the tree:
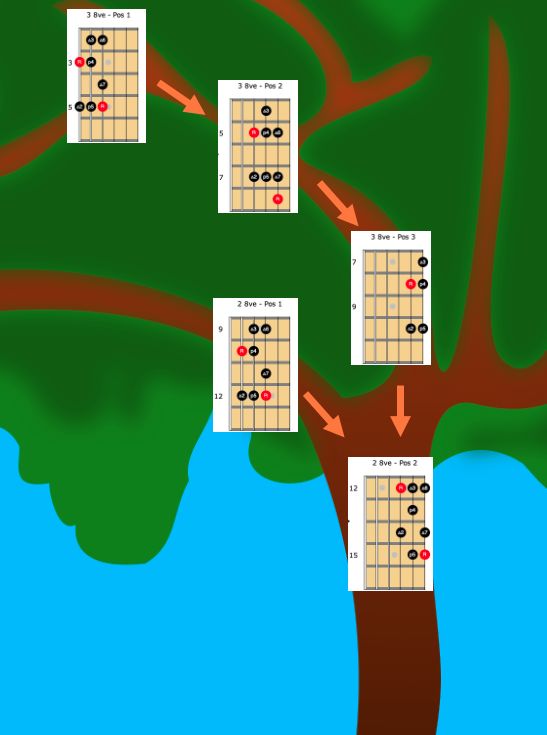
Once you’ve learned to thread these major scale patterns together, you can choose to play through either of the two ‘branches’ of the system. Because the one octave patterns are all so similar, it makes it very easy to ensure you are hitting the correct notes of the scale everywhere on the fretboard.
So that completes our system: instead of learning five very unrelated positions (or box patterns) that overlap, you now have these easy to remember single octave pattern shapes threaded together through the entire fretboard.
Benefits of the Tree Jazz Scale System:
Here’s why this jazz guitar scale system is so powerful.
For example:
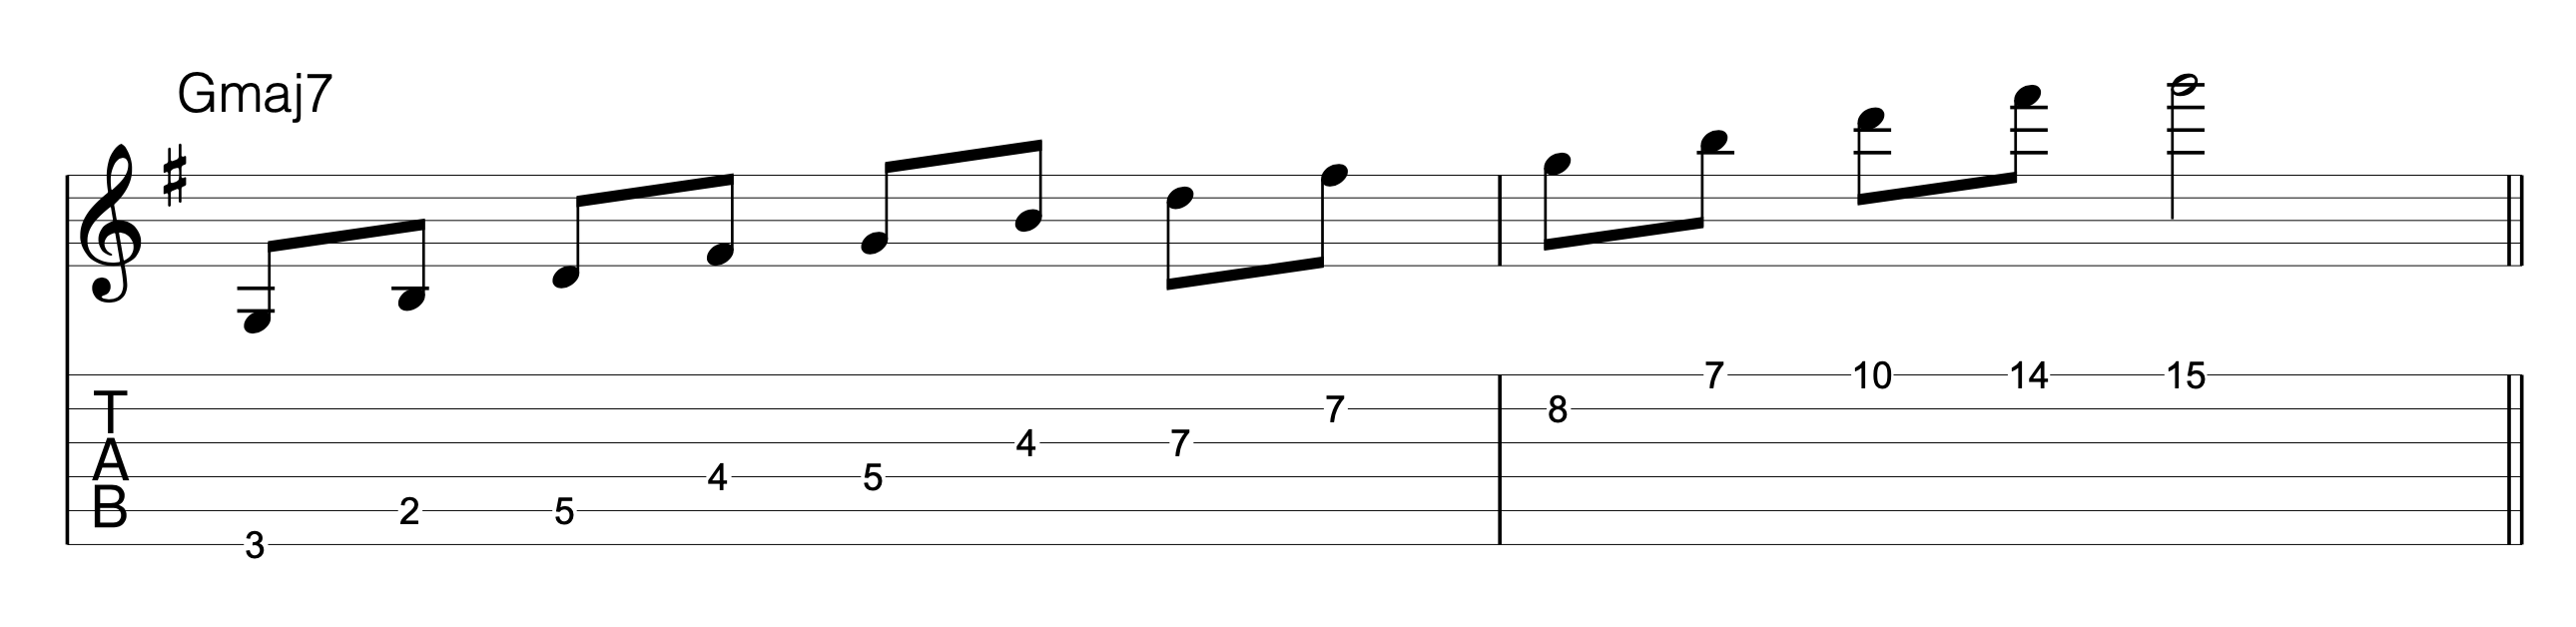
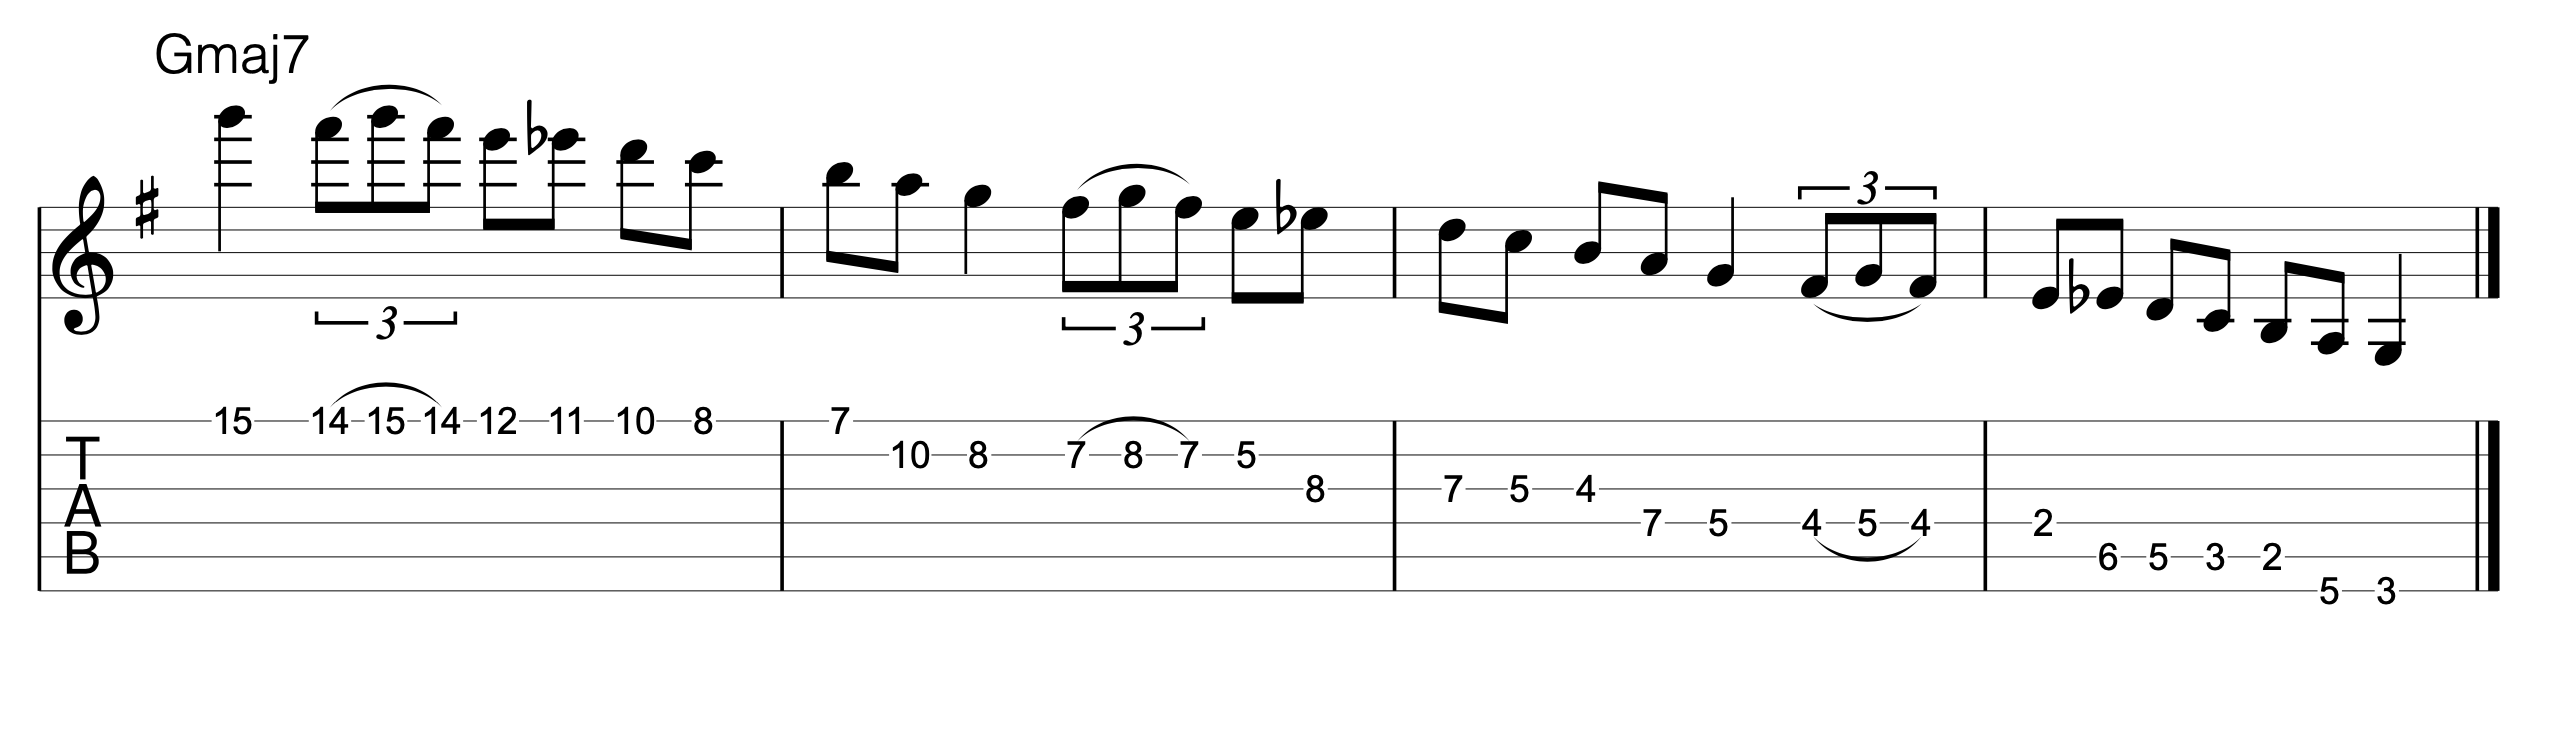
If I wanted to learn a Gmaj7 arpeggio, I can learn it with similar patterns on the fretboard and then link it all together to make a MEGA arpeggio over several octaves, giving me a lot more range to explore on the instrument compared to using a box pattern:
Joe Pass often mentioned that it’s useful to repeat licks again in another octave to get more mileage out of a line for jazz guitar improvisation. This system makes it simple as you just follow the tree down one of it’s branches:
Bonus Tip: Creating Other Jazz Guitar Scales and Modes:
Learning a single box pattern for every new scale you want to learn, that has no clear relationship to other scale patterns you learned in the past, confuses many students.
The Tree system, however, makes it easy to learn any other guitar scale or mode that you wish.
For example:
If I wanted to play G Dorian instead of G Major, I just need to lower the 3rd and 7th notes of the major scale pattern:
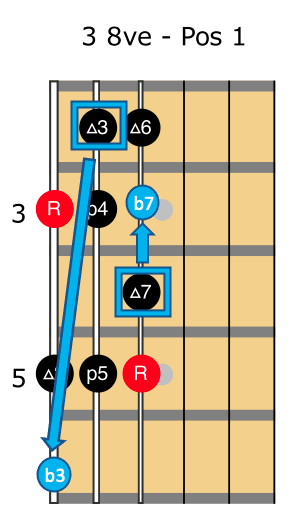
If I give each of the patterns from Branch #1 this treatment, I will now end up with a Dorian scale across the whole fretboard!
In this way, I can derive any scale I want simply by altering the relevant notes in each one octave pattern through the branches of the system.
As every new scale you learn is an alteration of the basic one octave major scale patterns, I believe the Tree guitar scale system is far easier to learn and less confusing than box scale positions.
Ironically, the more complex the music you play, the simpler the approaches you need.
Whatever system you end up using:
Make sure it’s one where you can focus less on trying to find the right notes, and more on actually making music.
Bonus PDF Download: To get your free printable PDF which has the jazz scales guitar tabs and diagrams for this lesson, go here>>
What Do You Think? Leave a Comment…
So there you have it – the Tree Guitar Scale Method revealed!
Over to you – what do YOU think of this jazz guitar scale system? Do you think I’m onto something here – or do you disagree with this method? Leave a comment below with your thoughts….
Greg O’Rourke
BMus (Hons), ANU
Founder, FretDojo

Thank you Greg! I’m an intermediate player and I’ve been working on learning the five CAGED pentatonic scale box forms and the corresponding five CAGED diatonic scale box forms.
I’ve just started working on the seven 3 notes-per-string diatonic scale forms, and I can see that your Tree System boils these scale forms down to what appears to be their most useful essence. Wonderful!
Thanks Greg
I tend to add the 7th note in the beginning purely as it helps me visualise the overall pattern ( first 2 strings being the same for the major scale pattern)
Greg,
What a practical approach for managing scales and chords! This approach has encouraged me practice using backing tracks. I realize how these patterns will improve my knowledge of the fingerboard and bring more color to my solos.
Thank you so much!
Greg, even easier:
Looking at any major scale on a single string the number of frets between each scale degree are:
1 – 2: 2 frets (2 semitones)
2 – 3: 2 frets
3 – 4: 1 fret (1 semitone)
4 – 5: 2 frets
5 – 6: 2 frets
6 – 7: 2 frets
7 – 1: 1 fret
Now, we normally play major scales over 3 strings so, we need to know how to go up in pitch as we move from one string to the next.
The simple rule is:
To go up a semitone go back 4 frets on the next string (eg 6th string to 5th string).
To go up 2 semitones go back 3 frets (eg 6th string to 5th string).
[When going between the 3rd and the 2nd string we go back 3 and 2 frets respectively].
Using this system, we don’t need to think about flattening or sharpening notes to get modes.
In the example used of playing G Dorian all we need to know is that Dorian starts on the second degree of the scale.
So all we need to do is call G 2 in the above numbering system (in the “box” which you used in your example, start a major scale with the middle finger and a minor scale with the index finger. Although it works equally well with other “boxes”).
If you want to play G Mixolydian, call G 5 in the above numbering.
Hello,
Your comment seems interesting but I did not understand it.
Could you give us an example with notes?
You say, You go up 2 semi tones, go back 3 frets on the next string ……
If I want to go from G to A , which note do I have to play to start the pattern ?
Sorry about not understanding but I am a beginner and thank you for your answer if you answer,
Cheers
I started with a simplified version of this, breaking things down to simple 3 note intervals of major, minor and dominant. chord changes happen too fast to think about root, scale, arpeggio unless you have done the many hours of homework required to get all that information under your fingers. Time well invested but still “time”. You touch on this method as you modify the tree pattern from major to dorian. Great presentation, Thank You.
Excellent, uses the Kiss principle to clear out the fog!
Thank you very much.
Your demonstration seems different from what we see and seems effectively easier to remember.
Thank you
Brilliant light bulb moment
Brilliant. Absolutely brilliant.