


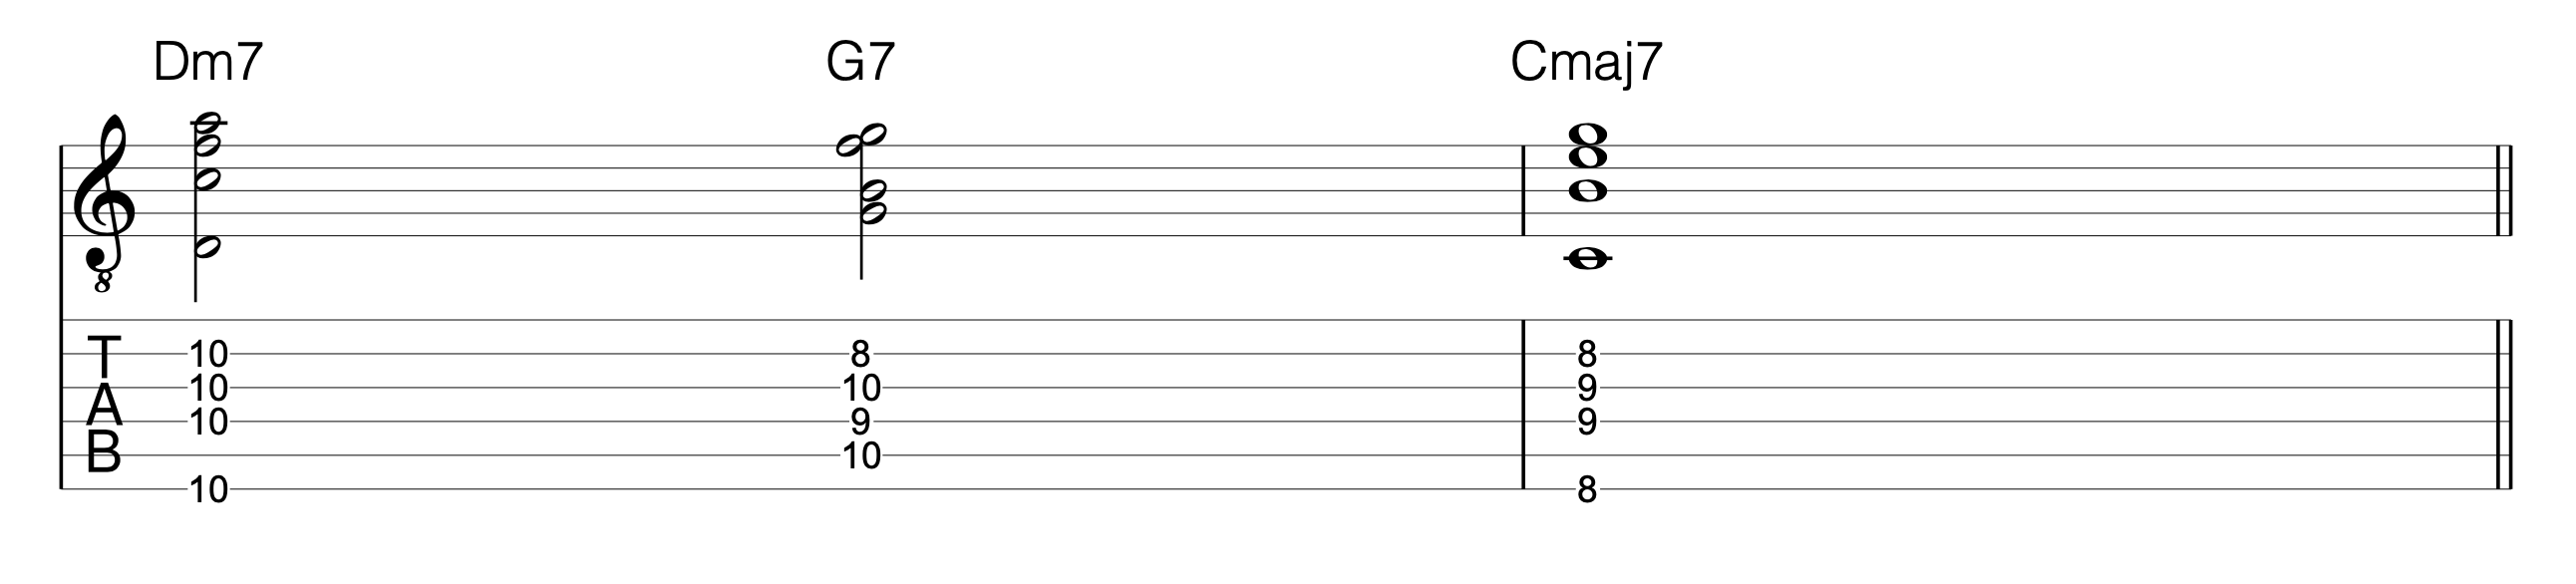

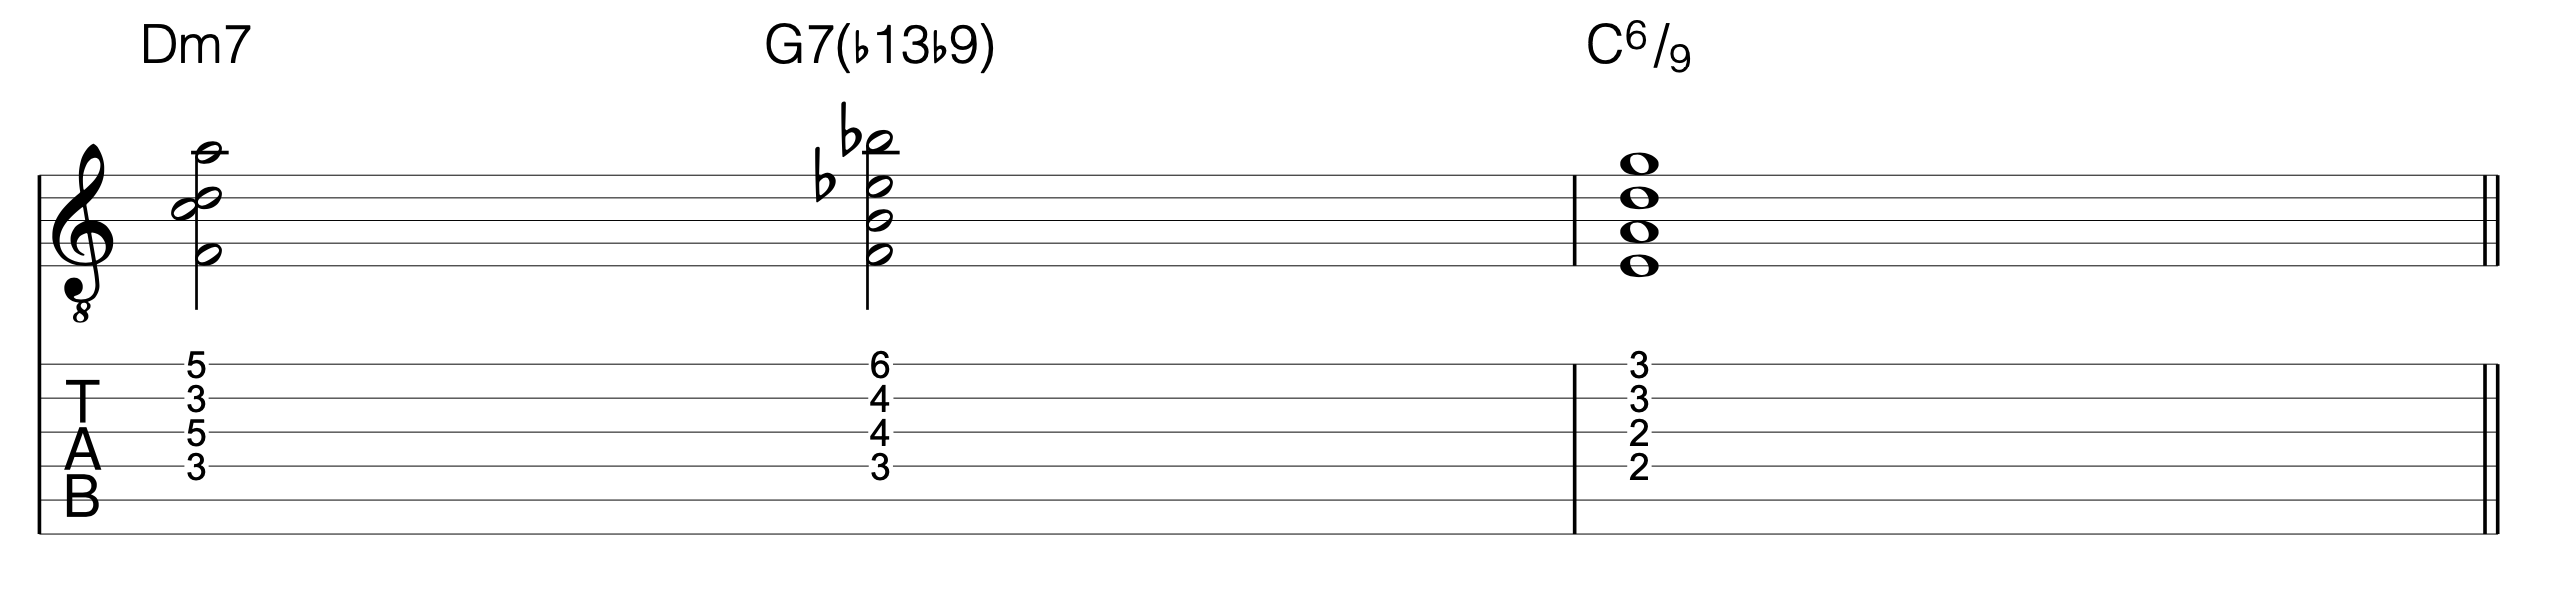
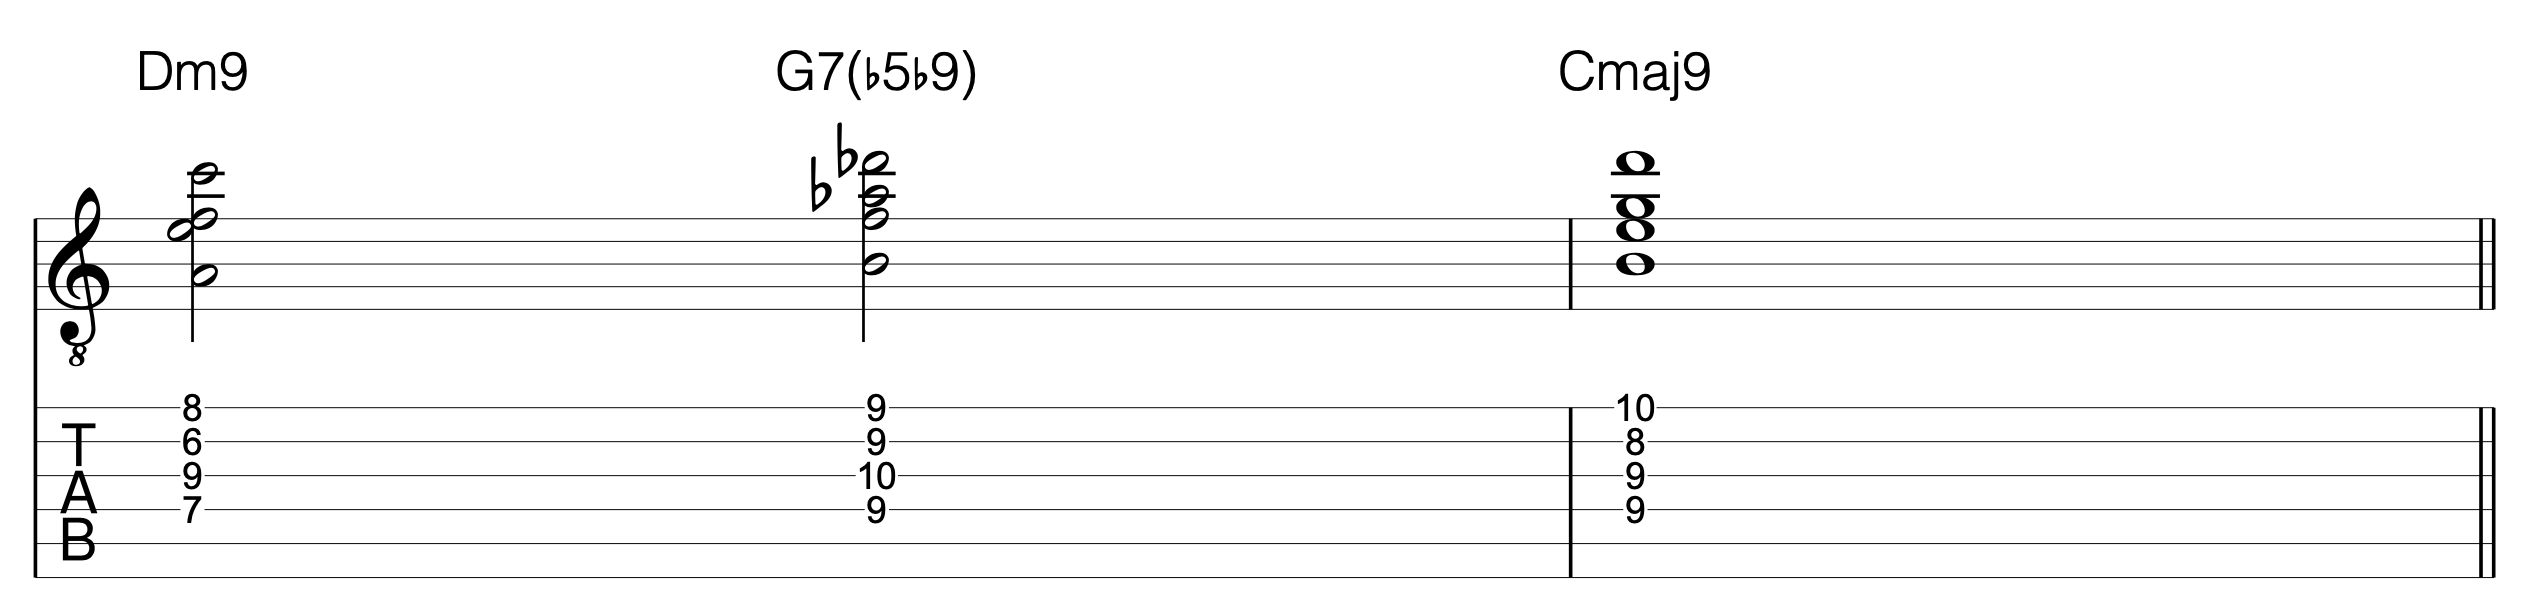
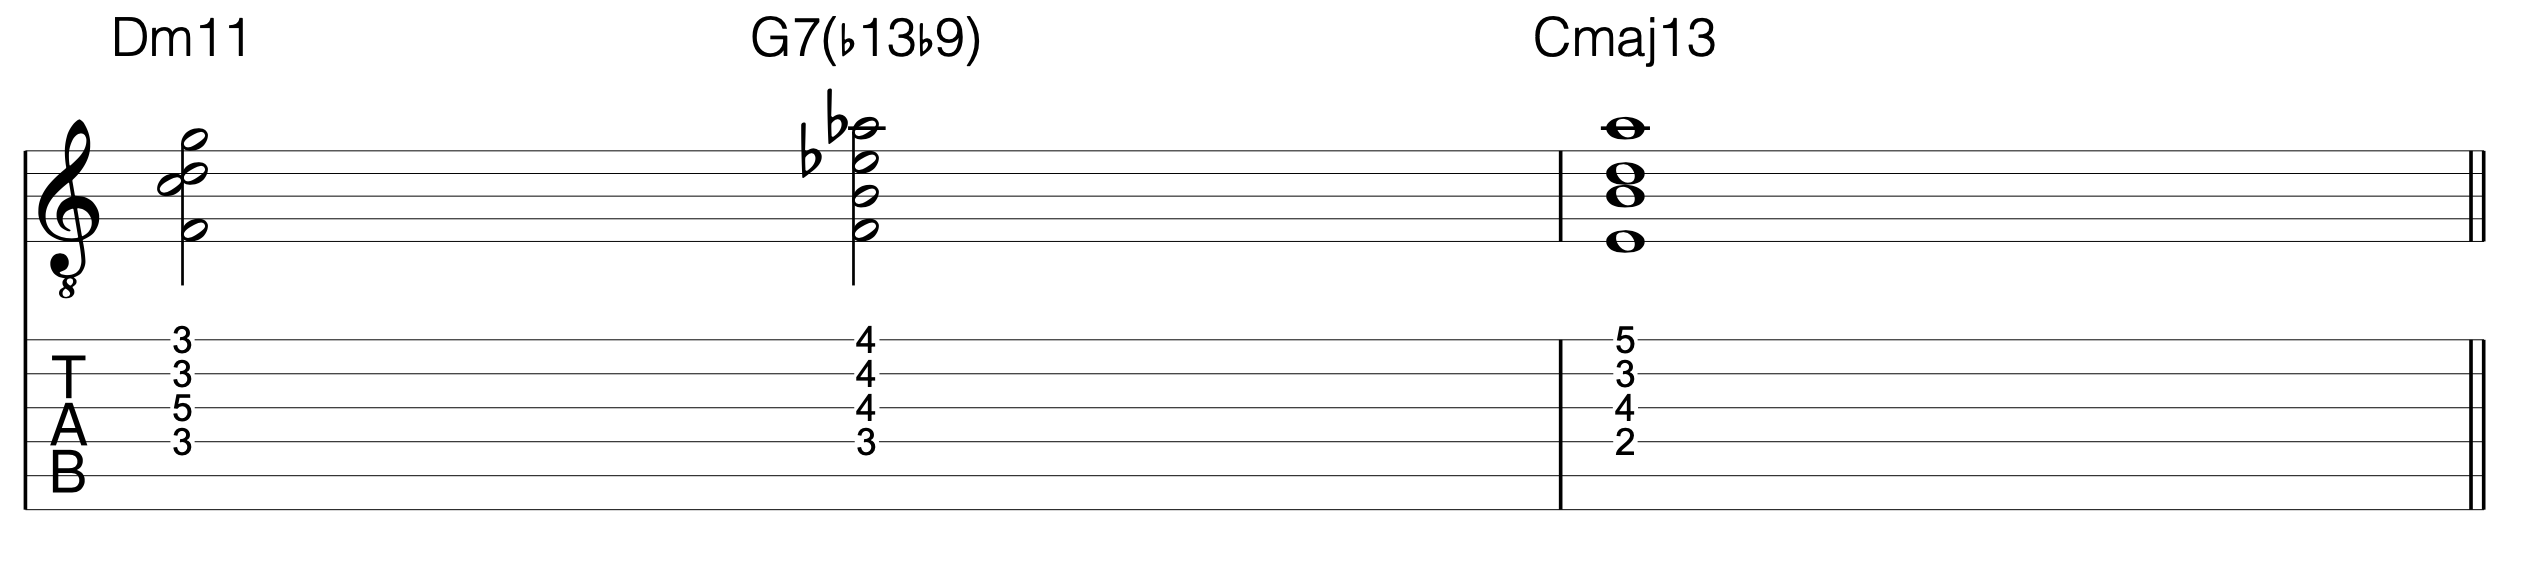
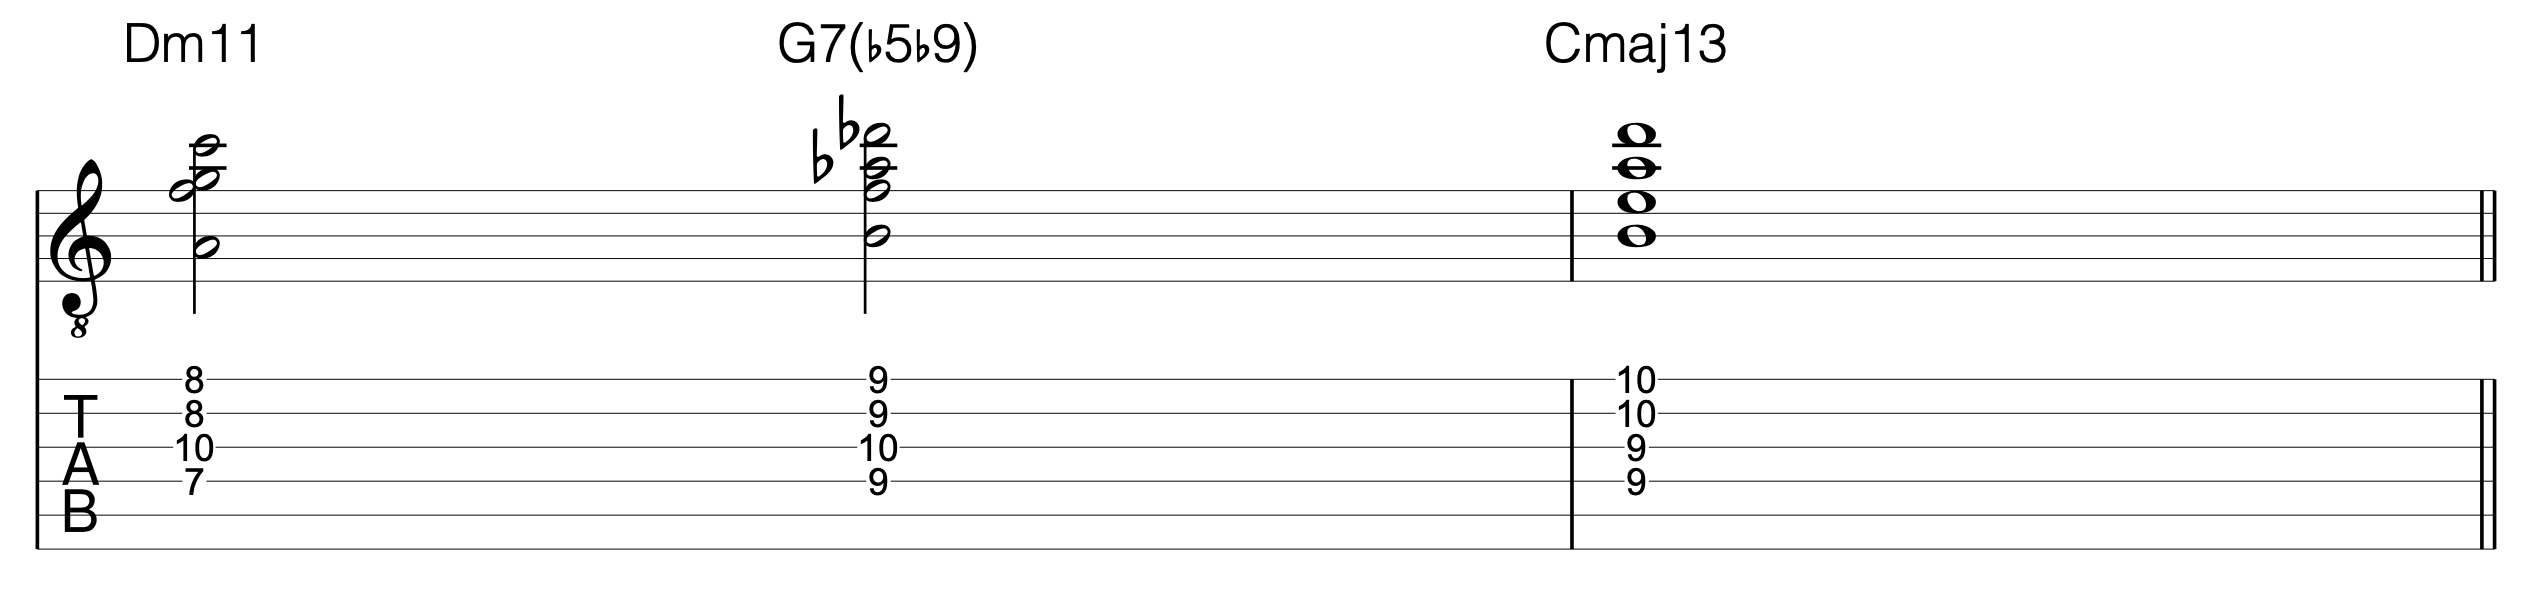
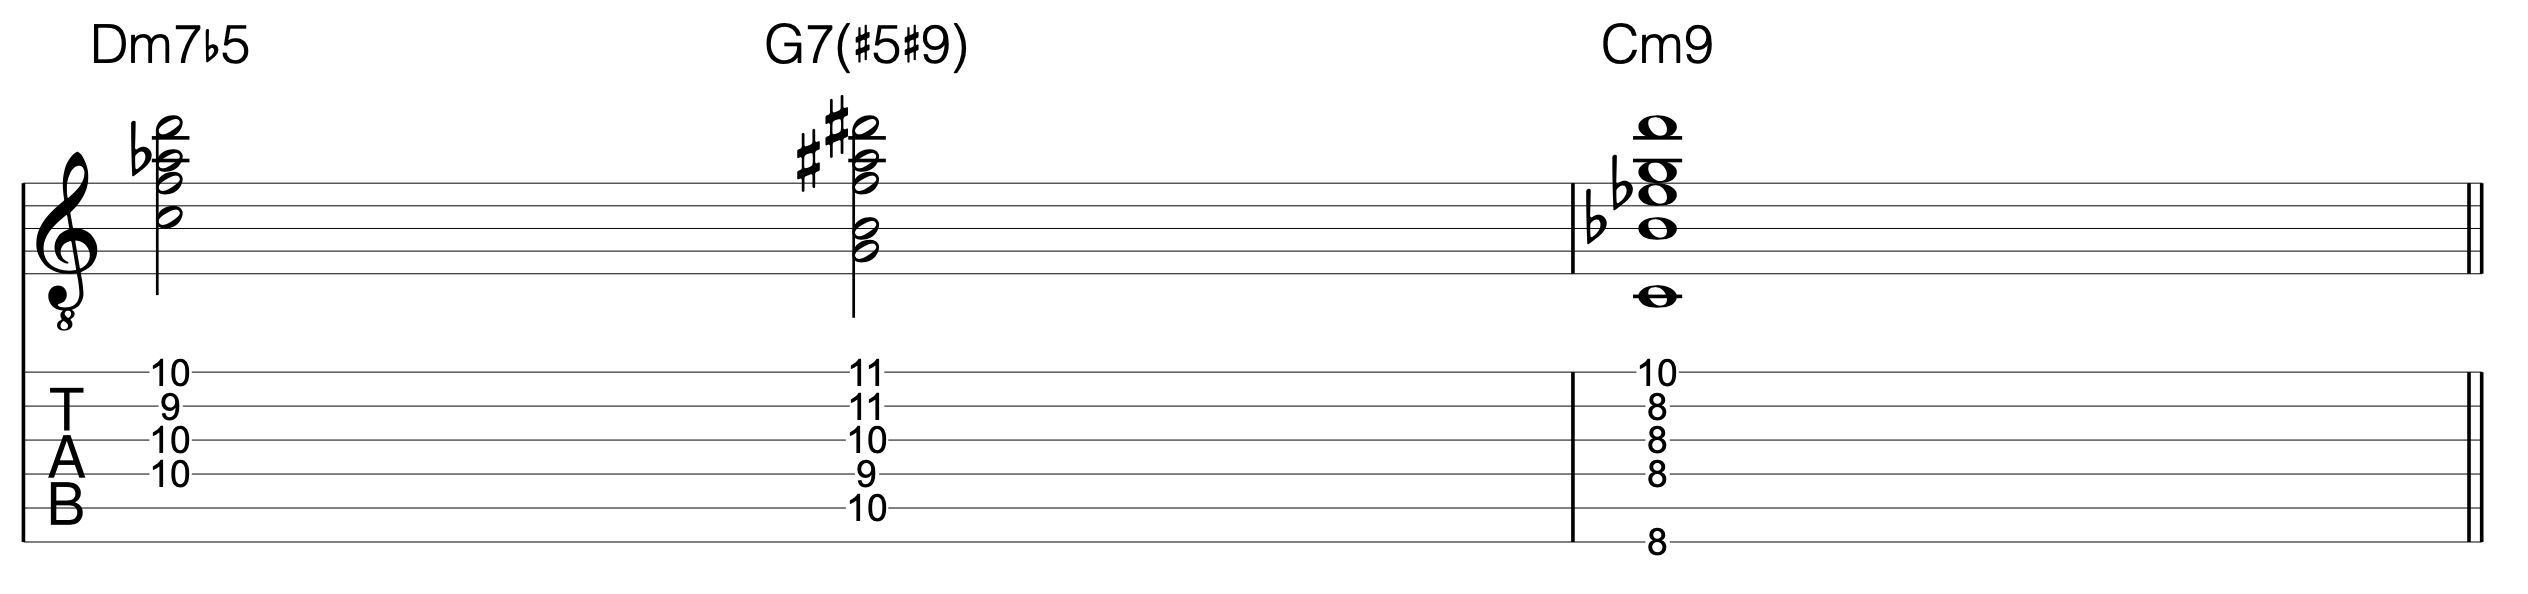
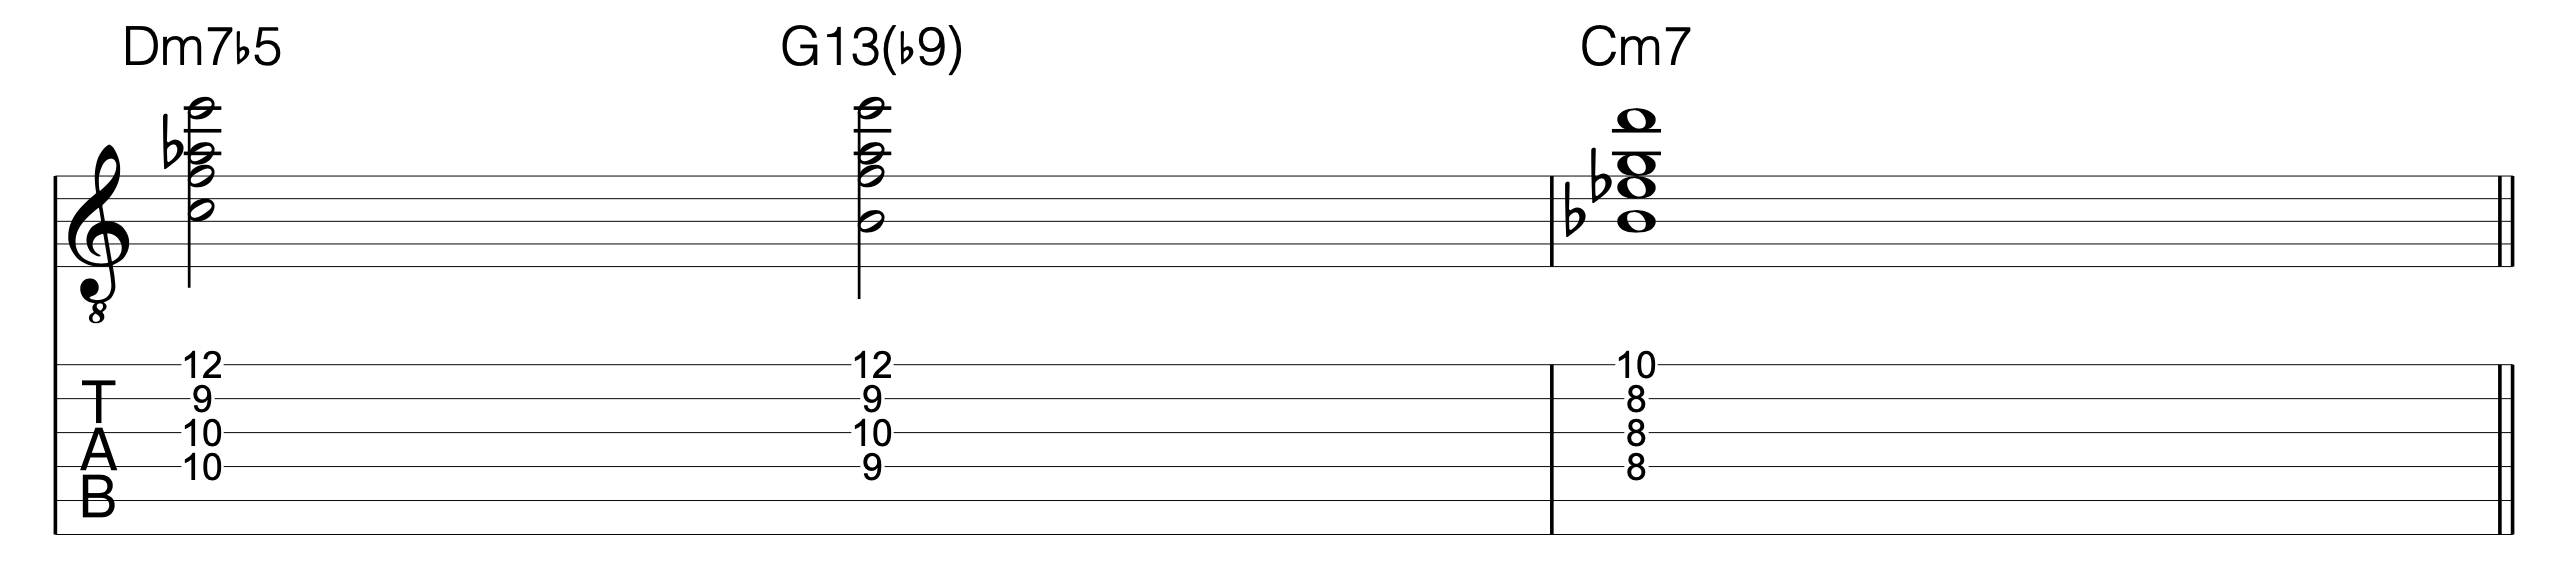

 What’s neat about this:
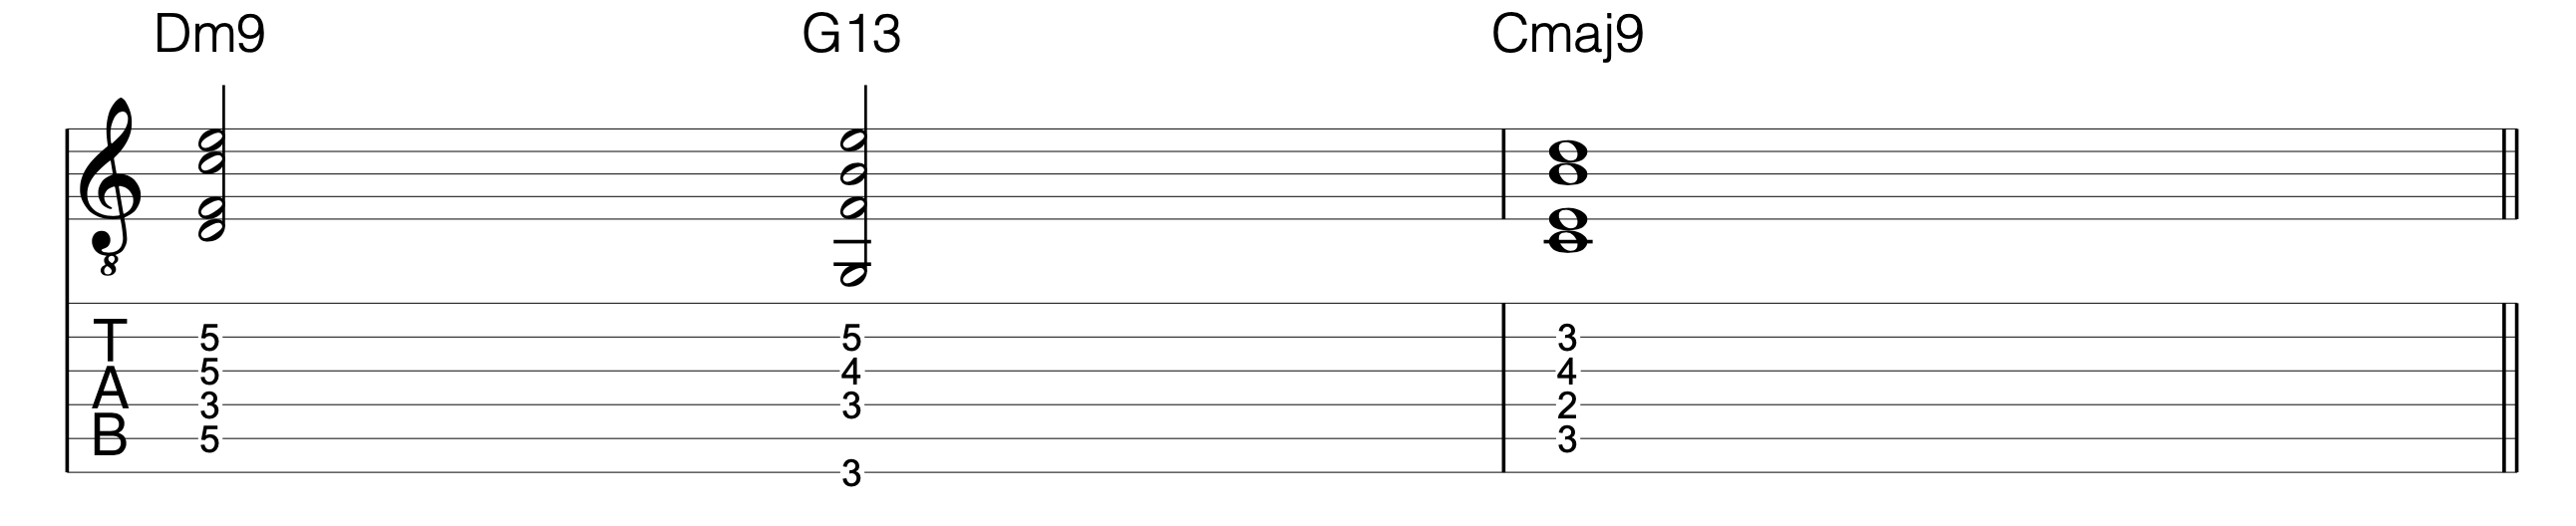
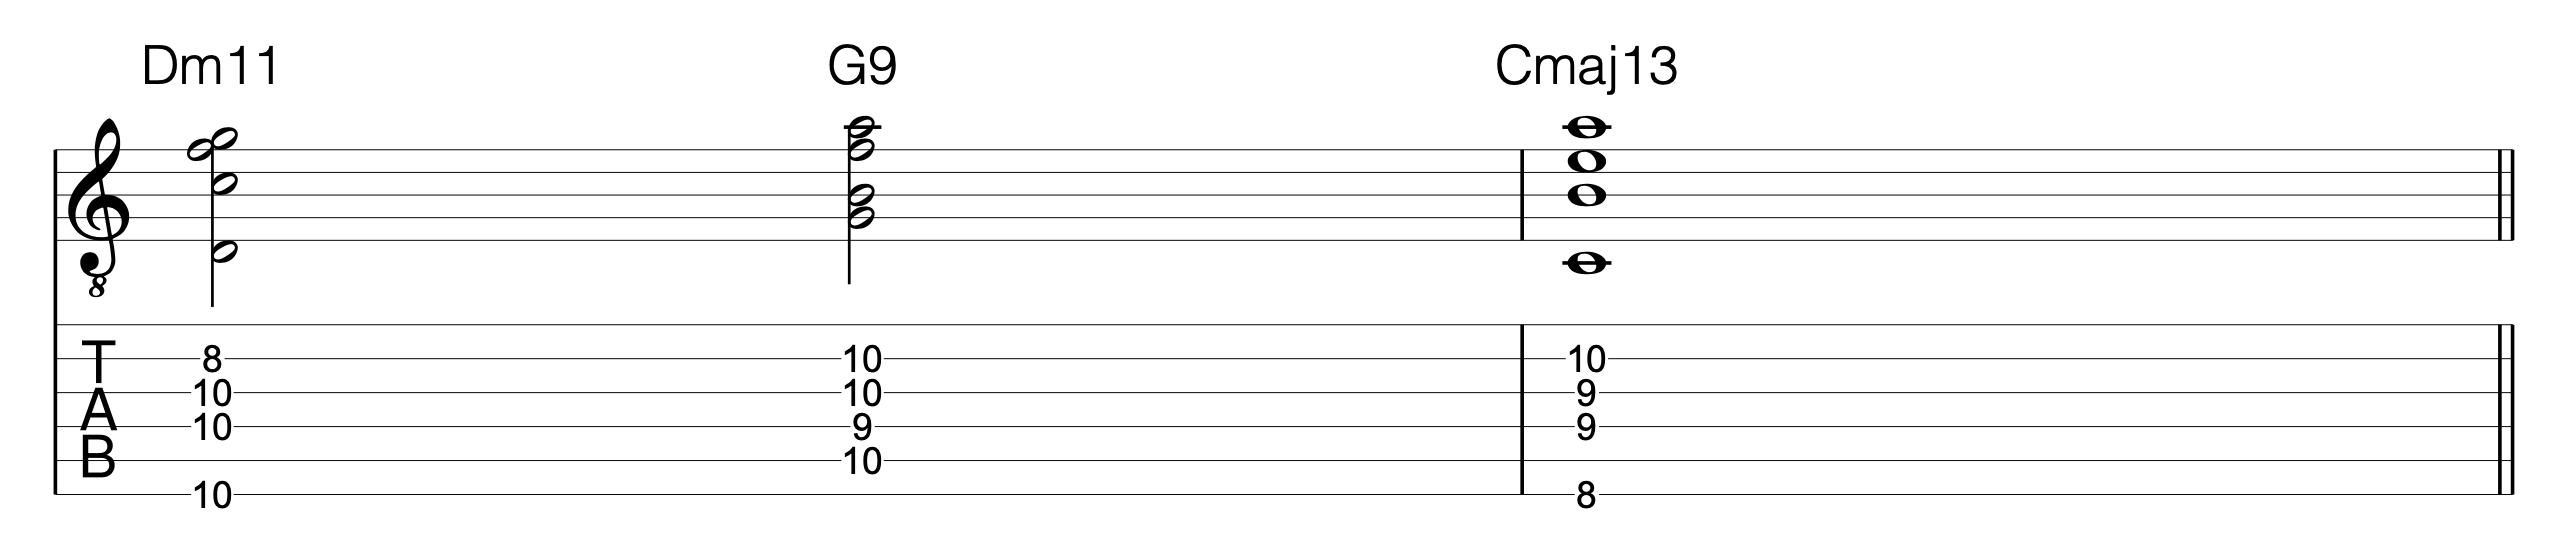
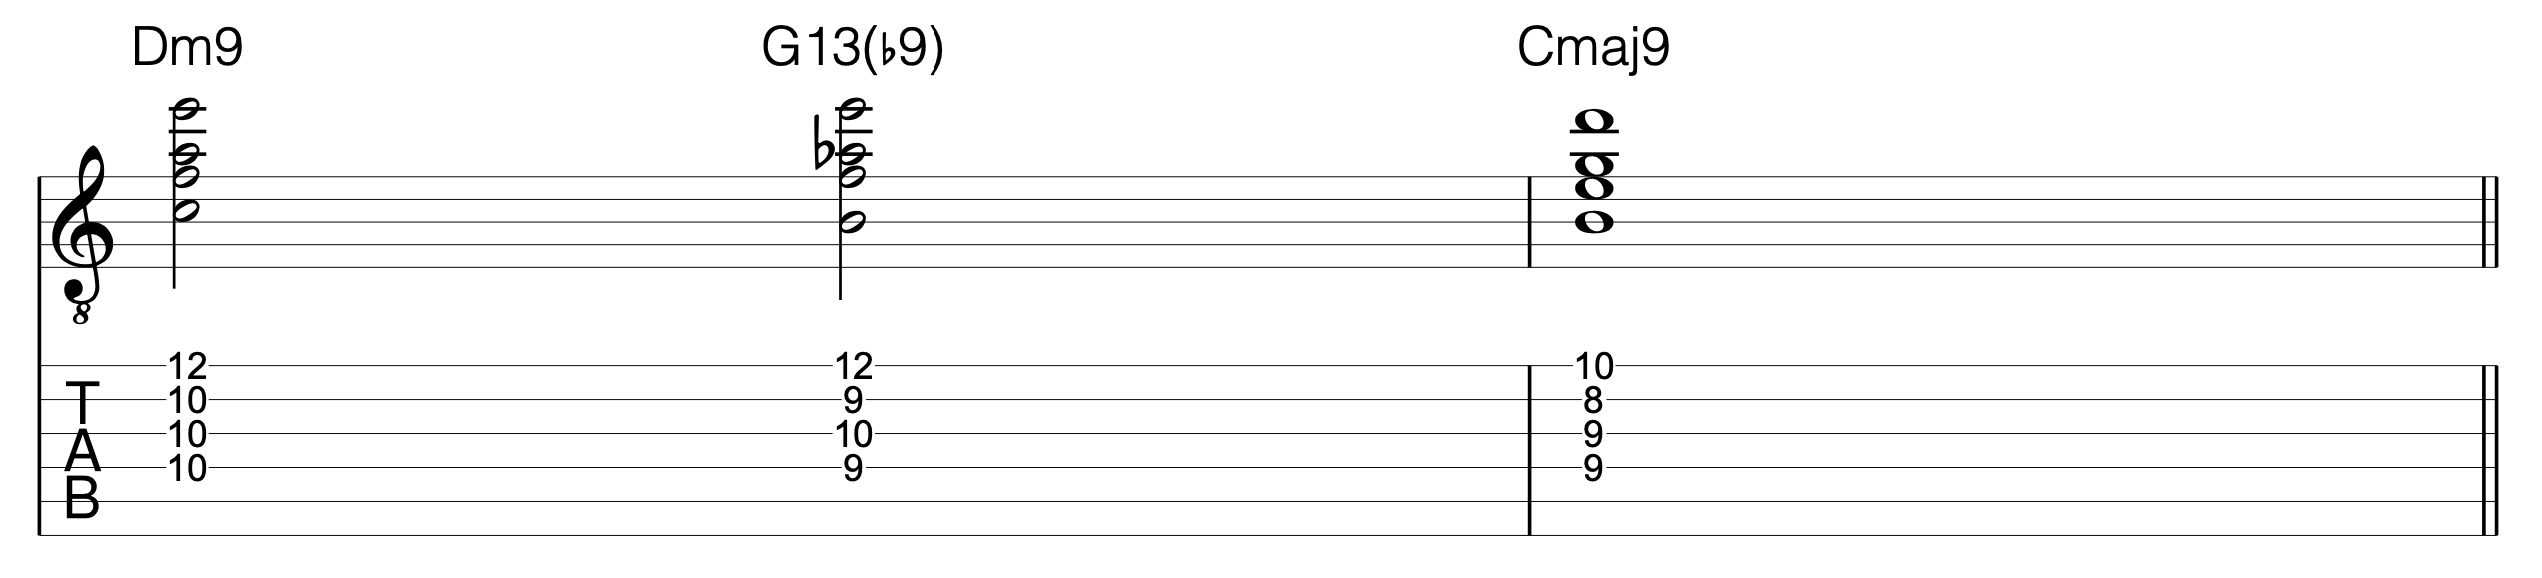
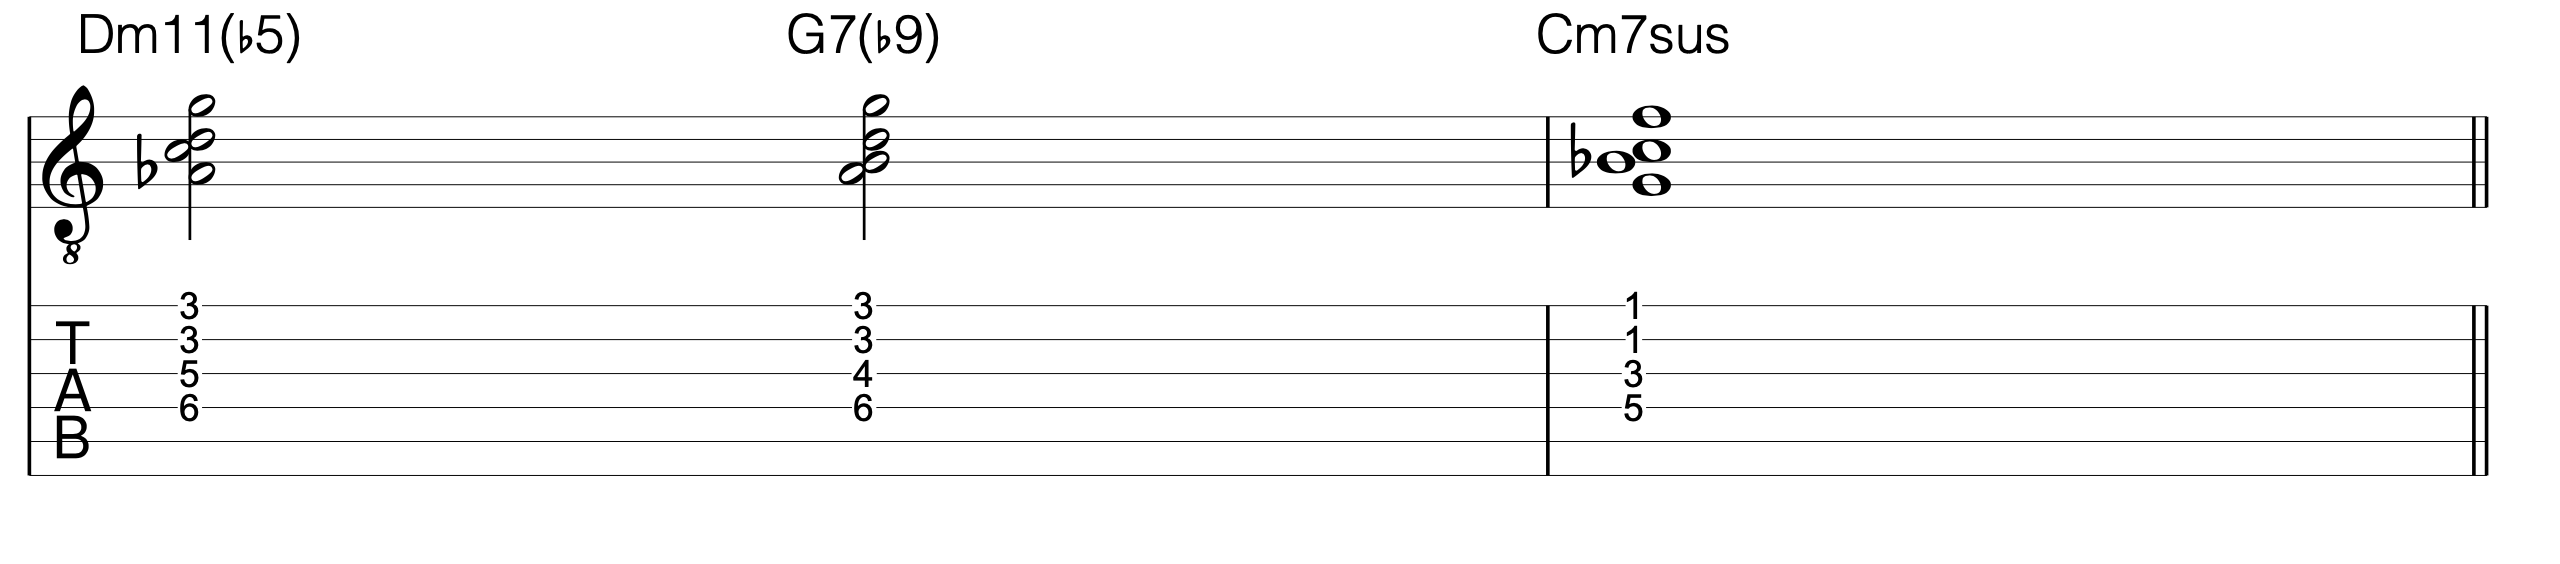
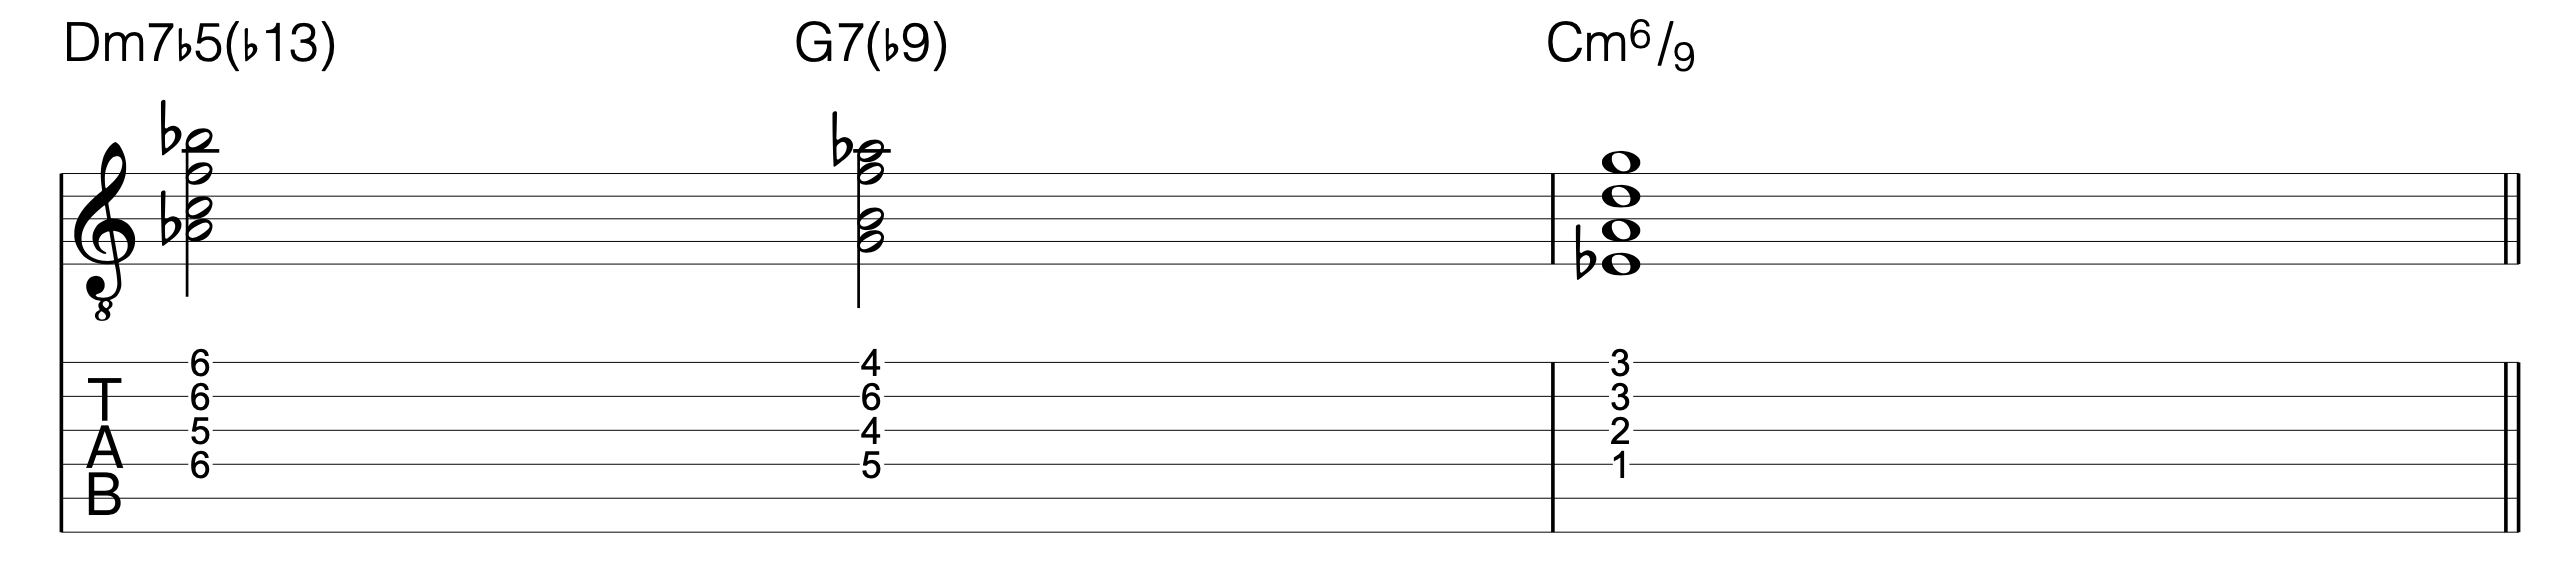


GET THE PDF FOR THIS LESSON HERE: https://bit.ly/2Tnfvrs In this episode I’m going to show…

Autumn Leaves Guitar Hacks – Easy Fingerstyle Lesson + TAB
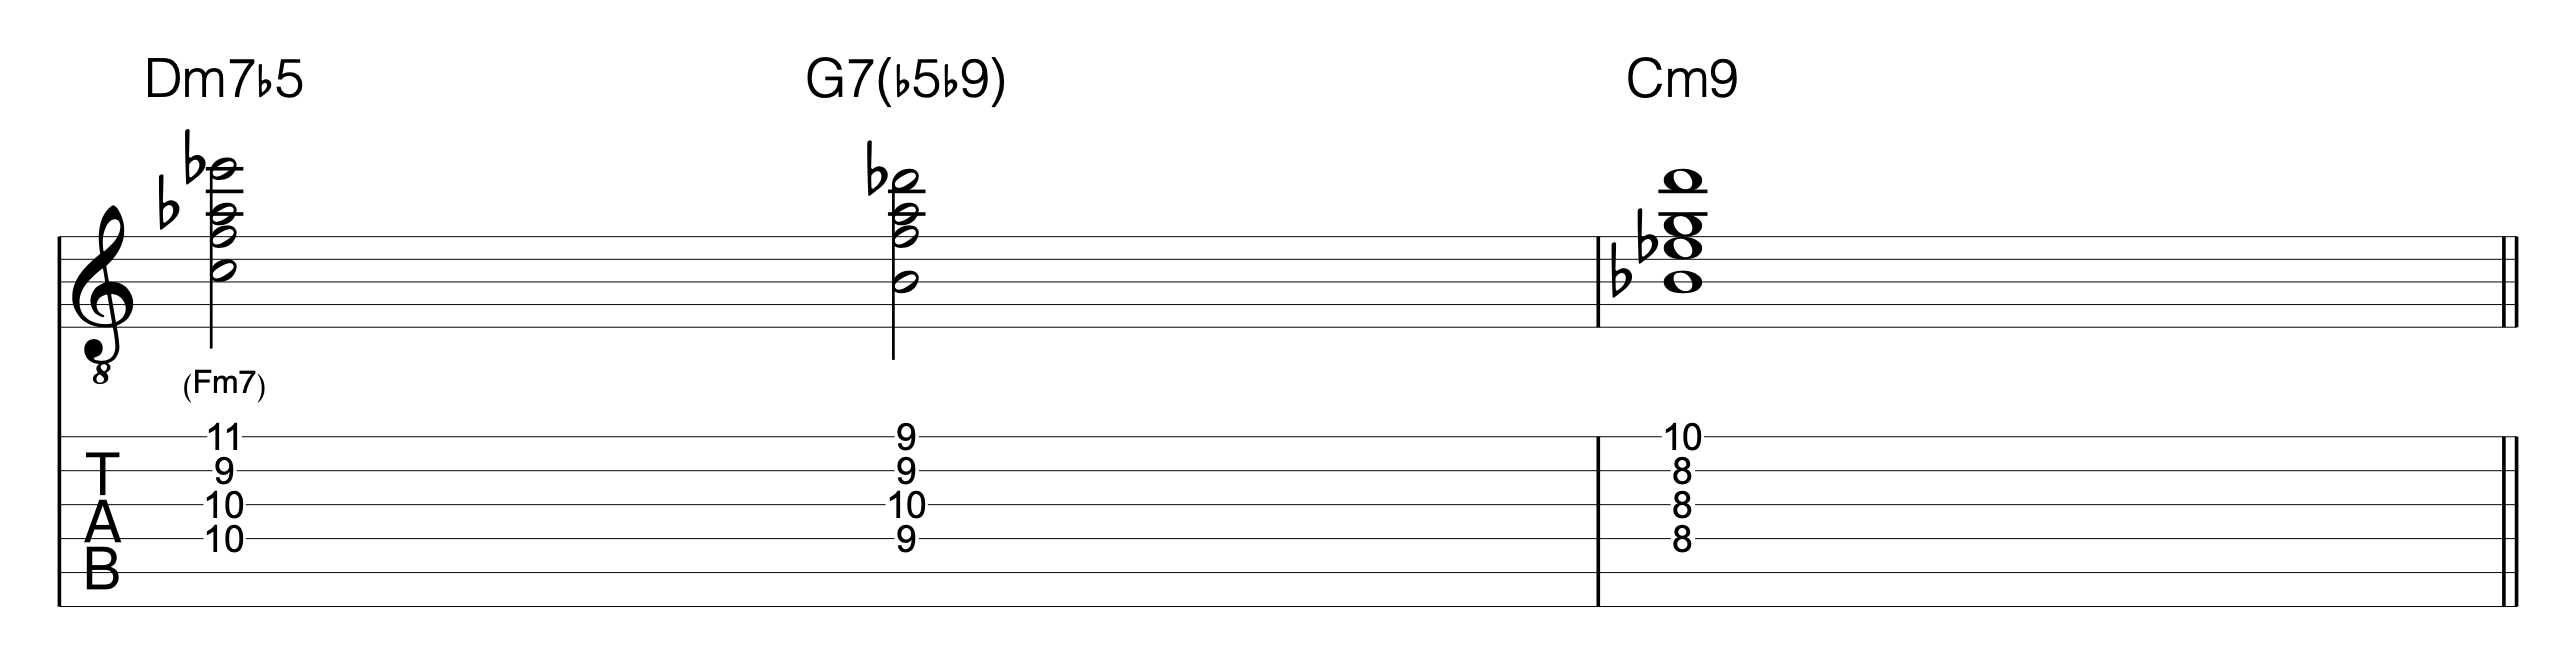
Autumn Leaves Guitar Hacks – Easy Fingerstyle Lesson + TAB
Recently I’ve been on a mission – to make the easiest Autumn Leaves guitar arrangement ever created.
Hey, presto:
After weeks of experimentation and hours upon hours of blood, sweat, and tears, here is the easiest Autumn Leaves chord melody in the known universe.
(Well…there may be easier ones out there, but this version is very playable while still sounding like you’re playing jazz chord melody at a pro level 🙂)
I’ve tried every arranging trick in the book to keep this fingerstyle arrangement as simple as possible.
In this guitar lesson, I’ll show you how to play this Autumn Leaves chord melody, including notation + TAB, so you have everything you need to get this beautiful song under your fingers.
Speaking of the PDF…
Get your Handy PDF Download:
Click here to subscribe to get a print friendly version of Autumn Leaves sheet music and tab for your practice.
Autumn Leaves Guitar Lesson – Video Table Of Contents:
00:00 Introduction
00:55 Autumn Leaves Full Speed Demonstration
02:08 Slow Trainer (With On-Screen Notation + TAB)
04:02 Tip #1: Use Fingerstyle Guitar Technique
04:46 Tip #2: Jazz Barre Chord Techniques
07:47 Tip #3: How To Practice Guitar Chord Melody Arrangements
09:25 Tip #4: Phrasing & Melody Tips
12:16 Latin Version (Advanced)
Hint: Go to section 2:08 of the video to play along with me at a slow tempo with the sheet music on screen – nifty!
Autumn Leaves: The Most Famous Jazz Standard Of All?
Autumn Leaves was composed by Joseph Kosma, with original lyrics by Jacques Prever (English lyrics by Johnny Mercer).
Interestingly, although this is one of the most famous jazz standards of all time popularized by US artists, Joseph Kosma was a Frenchman.
Many jazz musicians, such as Miles Davis and John Coltrane, have recorded instrumental versions of this song countless times. Here’s an example:
Although it’s a cliched song now to play in a jazz lineup, I’ve never gotten tired of hearing this exquisite, haunting melody.
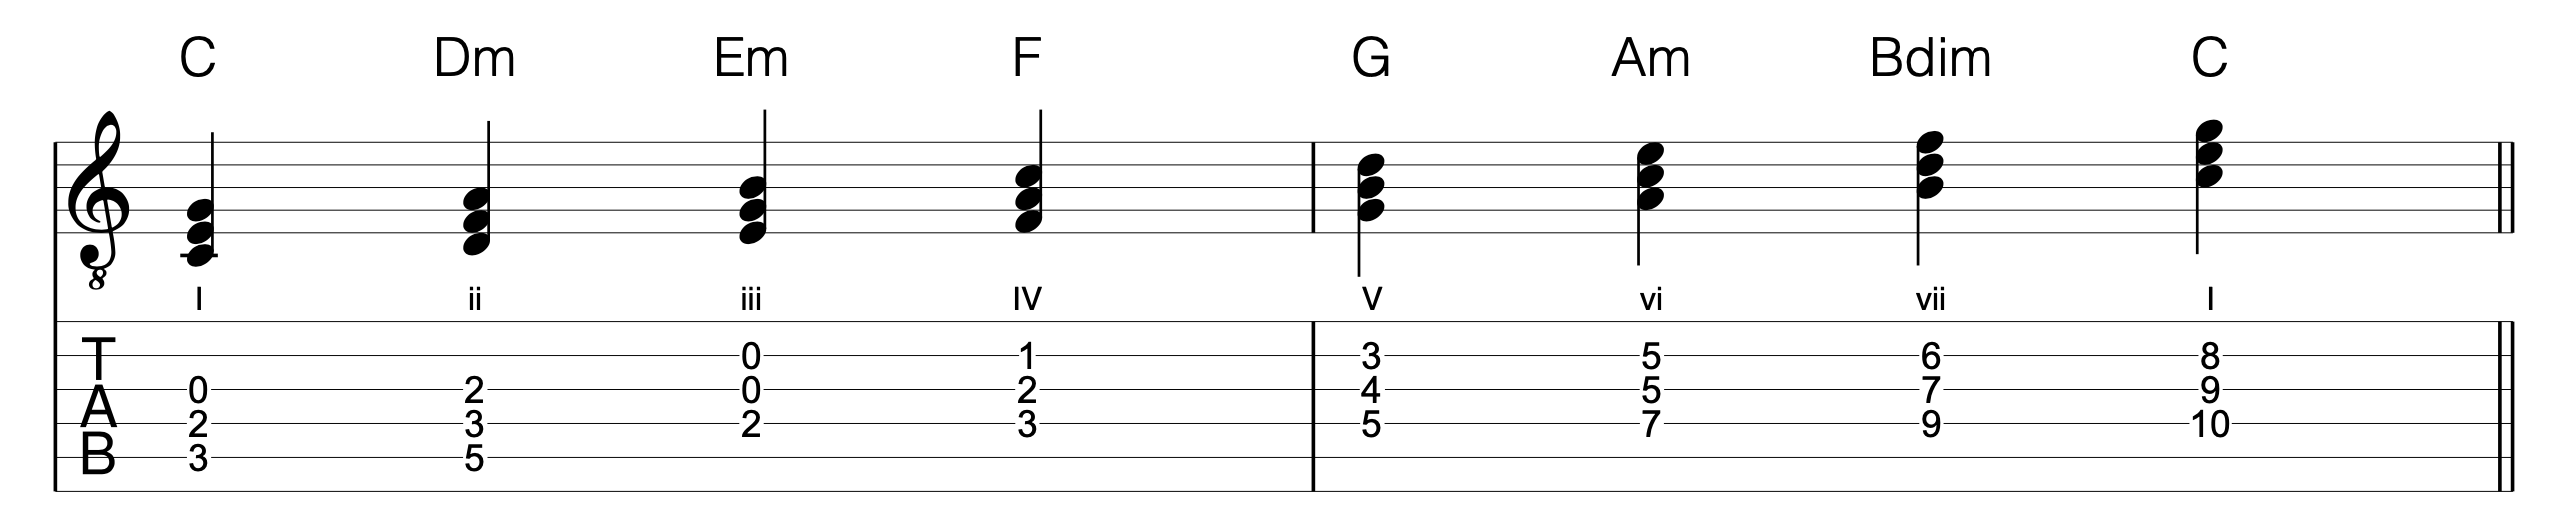
For a jazz guitarist, the chord changes are uncomplicated. Still, the genius of this song is its simplicity – from the use of relative major and minor ii – V – I progressions to the repetition of the same kind of melodic and rhythmic phrases over each chord change.
The English lyrics by Mercer are the icing on the cake that brings a whole new level of meaning to this song.
Best of all:
The way the melody is structured and the key of E Minor is perfectly suited to the guitar’s tuning – with the availability of all those handy open strings.
How To Play Autumn Leaves – Chord Melody Style
Sometimes the tiniest tweaks to a chord melody arrangement can yield enormous dividends to its playability and sound.
Although I’m using largely basic chord shapes and shell voicings, you may need to learn a few tricks to get these working well.
See below for some tips to make this arrangement easy on your fingers and to make it sound great.
Jazz Barre Technique
With jazz guitar chords, you’ll often need to do barres with fingers 2 and 3 – not just finger 1.
This ‘jazz barre’ technique might feel odd if you play classical guitar or other guitar styles – but it’s an essential skill for jazz chords.
Look at the sheet music of the arrangement, and you’ll see several places where you need to use these kinds of barres (specific instances are outlined later in this lesson).
Remember: everything becomes easier with familiarity.
If you practice these kinds of jazz barres for a short time daily, it won’t take you long before they feel second nature. See this post on jazz barres for some useful tips.
How To Play Chord Melody With Fingerstyle Guitar Technique
To play this arrangement effectively, you’ll need to have some solid fingerstyle guitar skills under your belt.
Fingerstyle allows you to simultaneously play independent bass lines, melody notes, and inner harmony, similar to Joe Pass’ chord melody guitar style.
The good news:
You only need to learn a few basic patterns to pull this off. See this post on a handy set of exercises to quickly develop fingerstyle technique:
Fingerstyle Tutorial: The Six Essential Fingerpicking Patterns You Need To Know
Autumn Leaves Guitar Arrangement: Bar By Bar Tips:
Let’s look at some tips for a few passages to help you get this arrangement up and running.
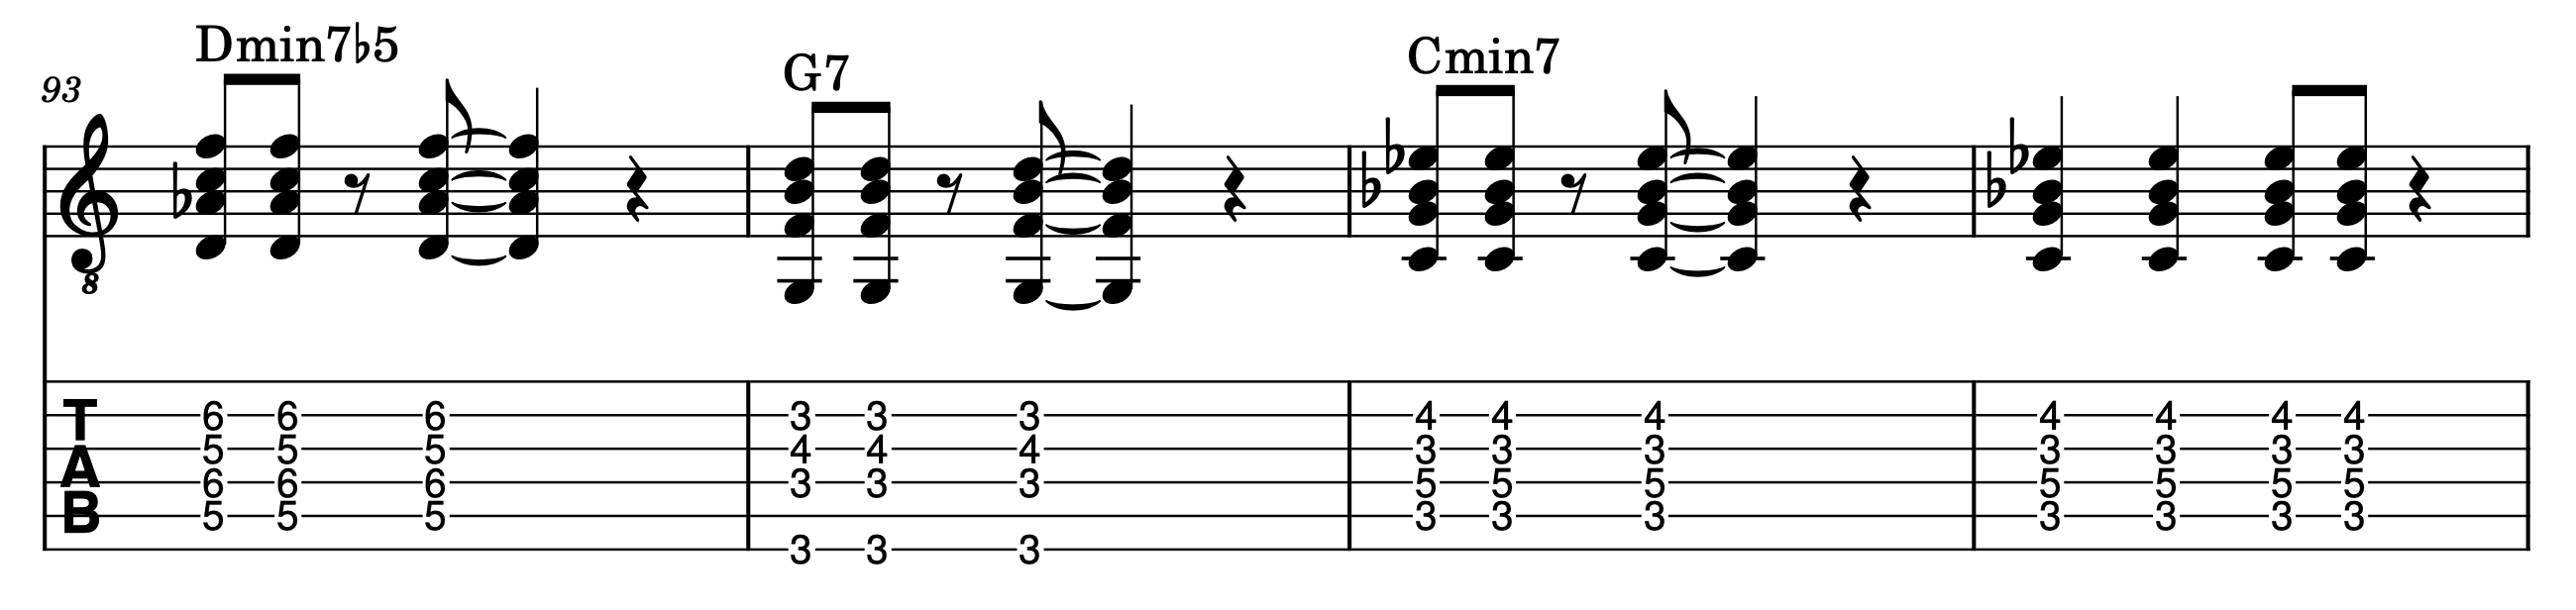
Autumn Leaves Chords – Bar 4:

Here’s where you need to use one of those 3rd finger jazz barres I mentioned earlier.
Although this can feel initially like an unusual technique (especially if you play classical guitar), don’t get into the mindset of thinking it’s ‘difficult’ – it just feels ‘different’ and ‘new’ to flatten your 3rd finger like this.
Once you get used to it, it’s a natural technique that can be very useful for many jazz guitar chords.
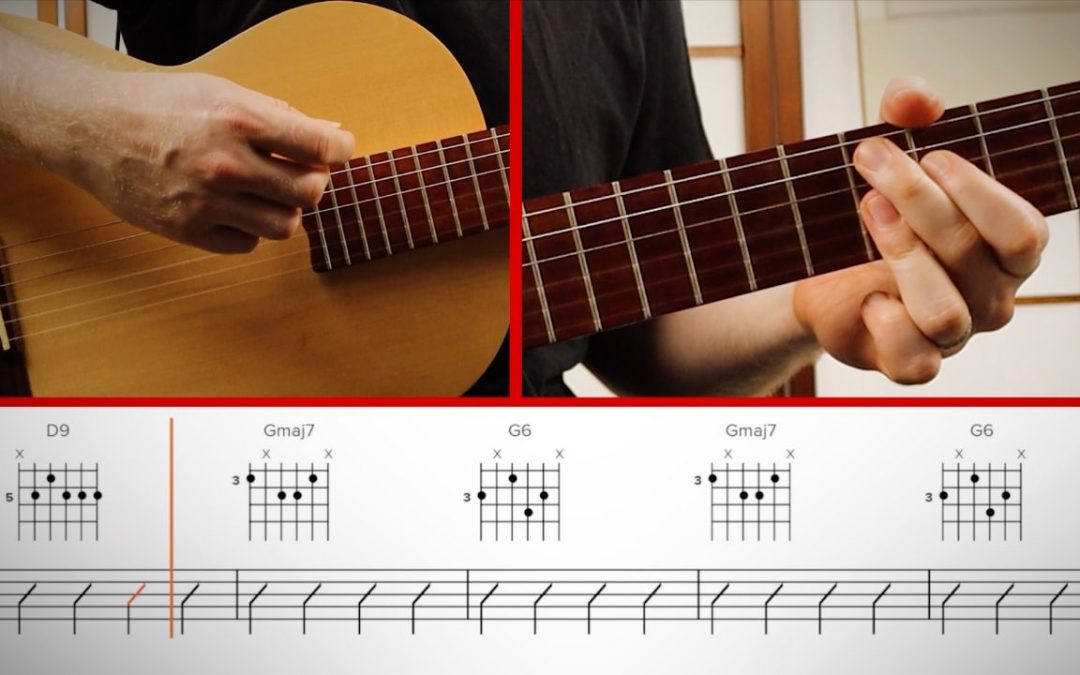
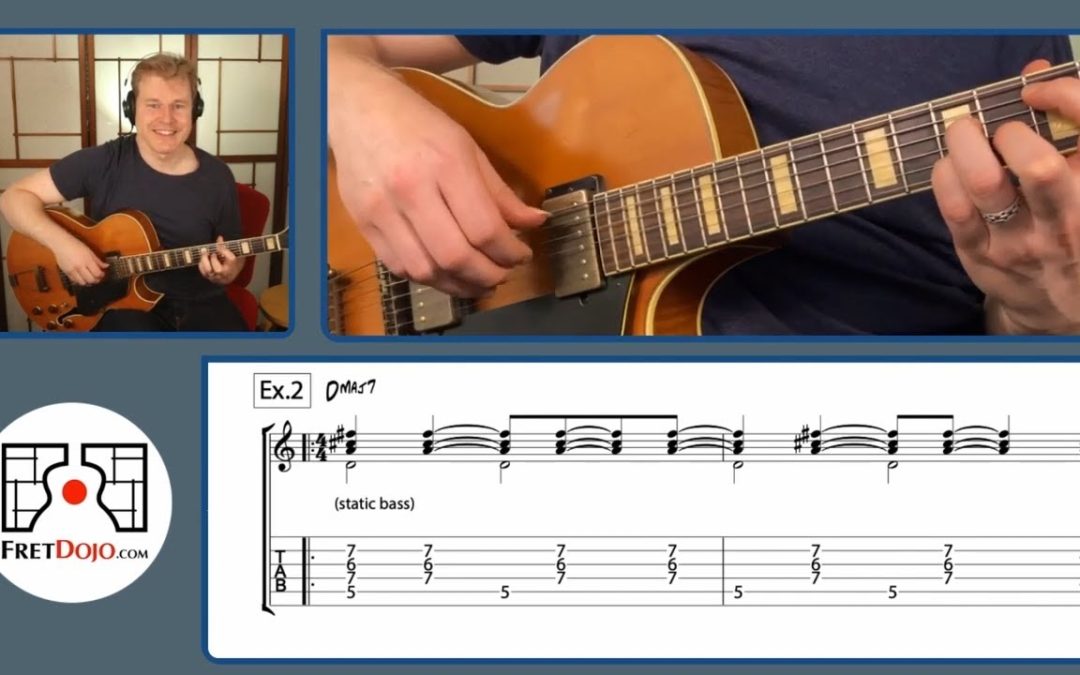
Autumn Leaves Chords – Bar 6:

Here’s another jazz barre – this time with the 2nd finger. The ‘½BV’ means ‘use a half barre on the 5th fret’ (V is the roman numeral for 5).
Once again, practice with some jazz barre warmups to work out the correct technique to do this with your second finger – after a while, it will open you up to many more jazz guitar voicings, such as the chords in these 2-5-1 progressions.
Bar 12 – Alternative Fingering:

Don’t be caught off guard by this tweak on the repeat of the A section. I used a slightly different pattern in the accompaniment this time around.
Here, I use an alternative fingering using open strings to facilitate a better sound and easier transition to the next chord. You’ll often find that these little tweaks can make an arrangement sound drastically better – and be much easier to play.
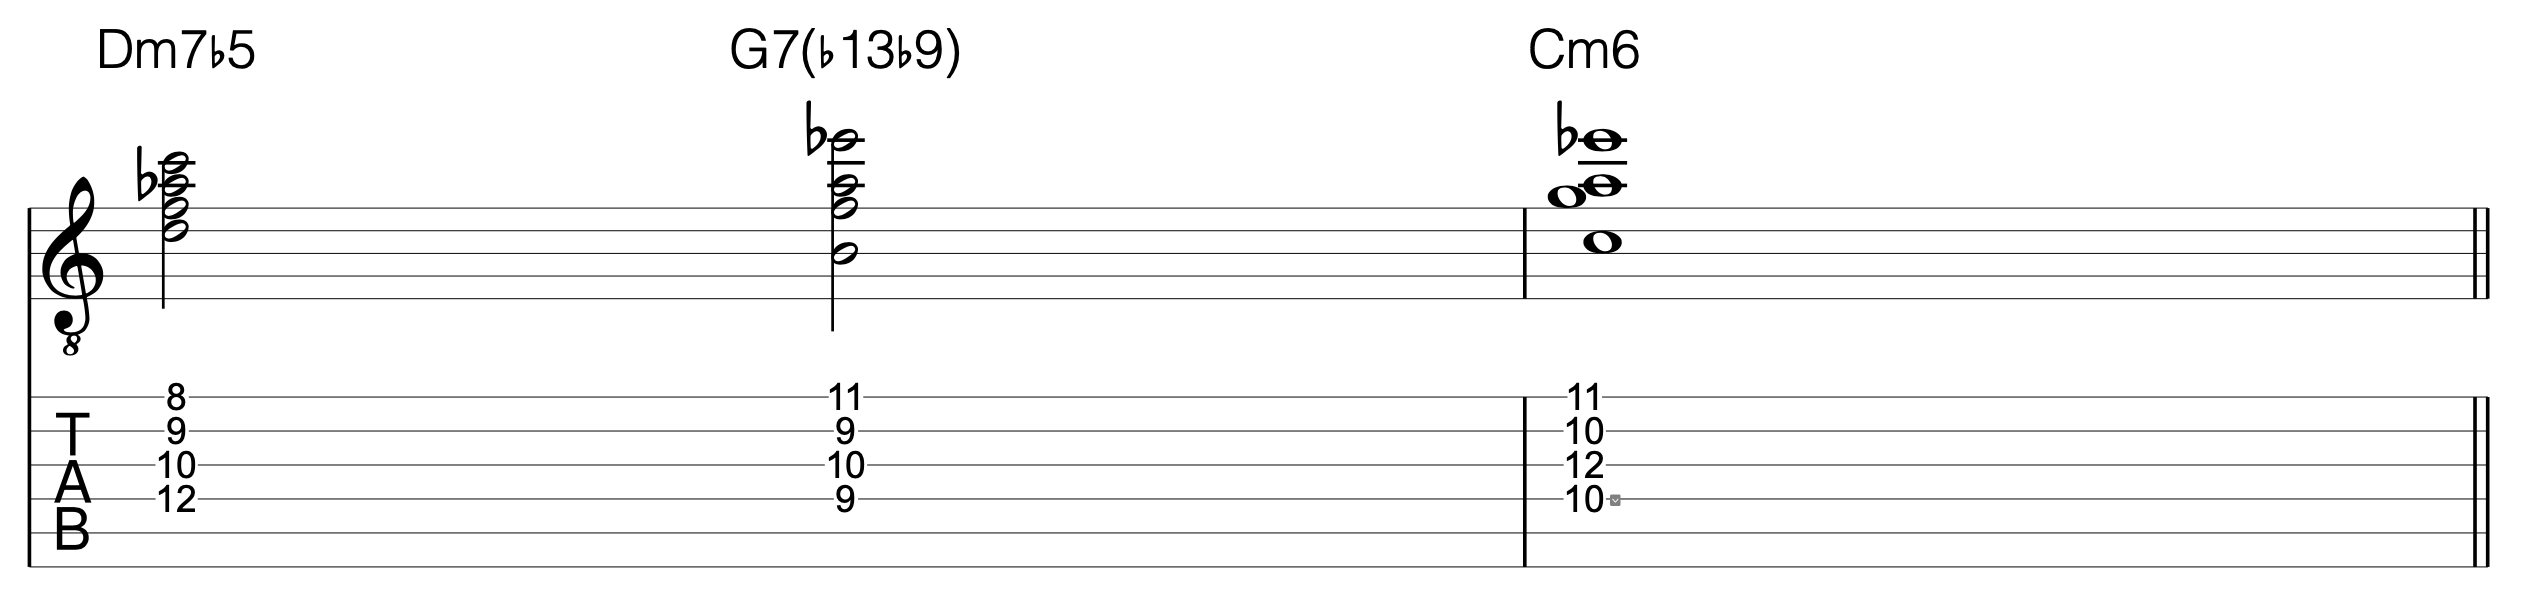
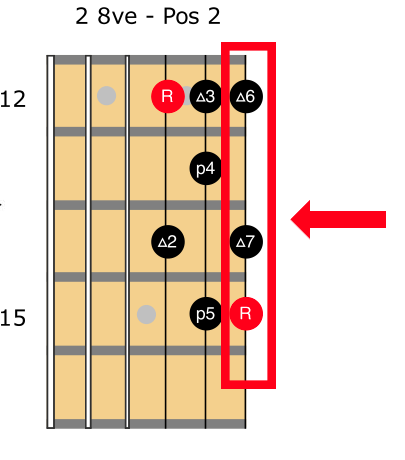
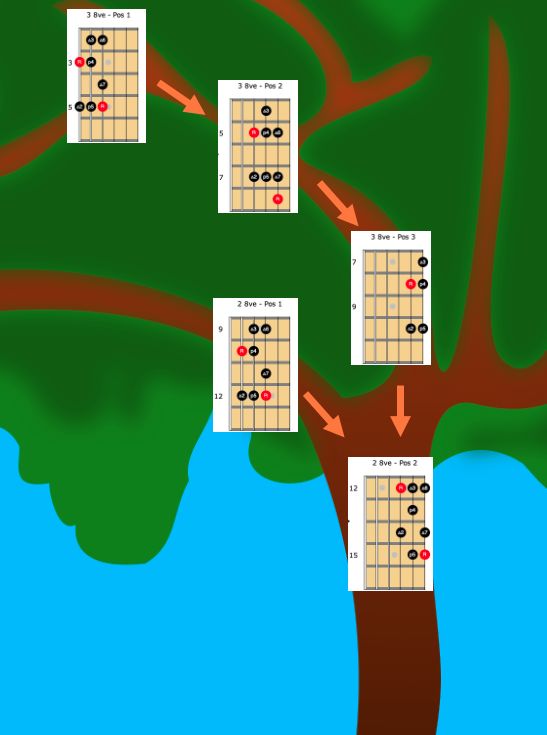
Bars 26 – 27: Common Chord Shape Down The Neck

It makes sense to look for patterns in chord shapes and common fingers in solo jazz guitar arrangements – especially when changing positions on the neck.
Notice how you can keep the same chord grip in bar 26 (in the red boxes) and slide that shape down the neck for bar 27. Noticing little hacks like this makes seemingly tricky passages much easier to play.
Bar 33 (Final Bar): Harmonics

I often finish my jazz chord melody arrangements with harmonics, a neat effect that is easy to execute.
To play them, lightly touch the 1st, 2nd, and 3rd fingers with your 3rd finger in a barre, directly above the 12th fret.
Important:
Don’t push the strings down as if you would play them normally; simply touch them lightly. For an added flourish, you can ‘roll’ the fingers to rapidly arpeggiate them (you can hear me do this in the recording) – indicated by the squiggly arrow symbol in the notation. But if you find that difficult, just pluck the notes simultaneously (or strum them with your thumb).
Make sure you check out the full lesson video at the top of this page for more tips and a slow practice video with guided onscreen notation + TAB.
Play Autumn Leaves – Further Resources
- If you’re interested in discovering more about this fascinating tune’s history, check out this great Wikipedia article on Autumn Leaves here.
- To get behind the theory of how the Autumn Leaves chord progression functions, here’s a great Autumn Leaves chord progression analysis lesson by Brent Vaartstra.
- If you need to get your fingerstyle technique up to scratch, check out my comprehensive guitar technique course here.
- And finally, if you want to learn how to arrange your own chord melody arrangements, look no further than my Chord Melody Foundations course here.
Reminder: Get your Handy PDF Download:
Click here to subscribe to get a print friendly version of Autumn Leaves sheet music and tab for your practice.
Guitar Lesson Wrap-Up – Leave a Comment:
I hope you have as much fun playing this chord melody as much as I enjoyed putting it together.
Over to you – what did YOU think of this Autumn Leaves chord melody arrangement? Leave your comments below – let’s get the conversation started….
About The Author: Greg O’Rourke
BMus (Hons), ANU
Professional Guitarist & Founder of FretDojo.com
 Award-winning Australian guitarist Greg O’Rourke received his Bachelor Of Music Honours degree in 2006 and was a scholarship holder at the Australian National University School Of Music.
Originally a trained classical guitarist, Greg has developed a high level of expertise in jazz guitar and other styles. Greg’s versatile guitar ability is a credit to several teachers he has studied with over the years, including Mike Price and Don Andrews, well-known performers and teachers in the Australian jazz guitar scene. Greg also studied extensively with Tim Kain, one of Australia’s leading classical guitar performers and teachers.
Greg has given prizewinning performances at the Australian National University Chamber Music Competition and was awarded 1st prize in the Chamber Music division of the 2004 Australian International Guitar Competition.
Greg has many thousands of subscribers to his website and Youtube channel from all across the world. He is also an established author, with his book on jazz chord melody, The Easy Guide To Chord Melody Guitar becoming an international bestseller.
Greg has been featured on several high-profile jazz guitar websites, including Jazz Guitar Online, Fundamental Changes, and Takelessons.